Peabody has a few small wear issues that have been eating at me, mostly due to 3 years of pleasured service but its time to follow through on them. I had a few small body issues I wanted to address this winter but the move into the new house really took alot outf me... (new furniture, bed, etc.)
Looking to repaint the wheels on my bus, ideally would love powder coat but don't really want to shell out $250 right now an see that being a better project for when the tires have to come off the rims.
I plan on taking the wheels off the bus to avoid overspray on the body, the last experience I had with those metal rings that sit over the bead to avoid painting the tire need with a nice cut on my hand. I don't really want have to tape off because th tires are eternally soaked in tire shine. I've heard from watercooled friends use plaing cards wedged into the bead...
Another ideas?
Also plan to find the gremlin living between my battery and radio, he's ruined too many trips! Then on to powder coating the Roo's, new batteries, learning to replace brakes, and hopefully adding some camping amenities. With graduation this May, I plan on this summer dragging me and Peabody from our slump before we meet the world ths Fall.
Home away from Home, on wheels.
Forum rules
This forum is specifically intended for you to post generic questions related to a repair.
If your question is specific to a project, or your VW please post in your VW's Garage Space.
This forum is specifically intended for you to post generic questions related to a repair.
If your question is specific to a project, or your VW please post in your VW's Garage Space.
-
ObnoxiousBlue

- Site Admin
- Posts: 1422
- Joined: Tue Sep 09, 2008 5:23 pm
- First Name: Mike
- Vehicle Year: 1964
- Model: Beetle
- Location: Above ground...
- Contact:
-
mannys66
Re: Home away from Home, on wheels.
Oak tag wedged between the tire and the bead of the rims has always done it for me.
-
AoT
- Posts: 1029
- Joined: Fri Oct 17, 2008 8:09 pm
- First Name: Audrey
- Vehicle Year: 1974
- Model: Beetle
- Location: Ready for a road trip....
Re: Home away from Home, on wheels.
Glad the vw bug has you bitten again.
Keep working at it and it gets done!!

Re: Home away from Home, on wheels.
The powered ROO will look sweet!
Glenn wrote:I have to say, this "gruppe" is so much more than just a car club.
MrBreeze wrote: This is the DVG board. The threads flow as they flow.
Deal with it.
-
ObnoxiousBlue
- Site Admin
- Posts: 1422
- Joined: Tue Sep 09, 2008 5:23 pm
- First Name: Mike
- Vehicle Year: 1964
- Model: Beetle
- Location: Above ground...
- Contact:
Re: Home away from Home, on wheels.
In light of some recent "recreational drug use" allegations, Ive found myself with more than a little spare time. Outside of work and school, Ive been tinkering alot around the house, but today got to get a lil down and dirty with the bus.

Started off with a serious wash down. The bus has been sitting (with few exception) since December, it moved the majority of our crap back when we slid across town to the new house and long since has deserved a scrub. After drying the bus, I decided it was too nice to go inside; so I decided to hop on a few small chores.
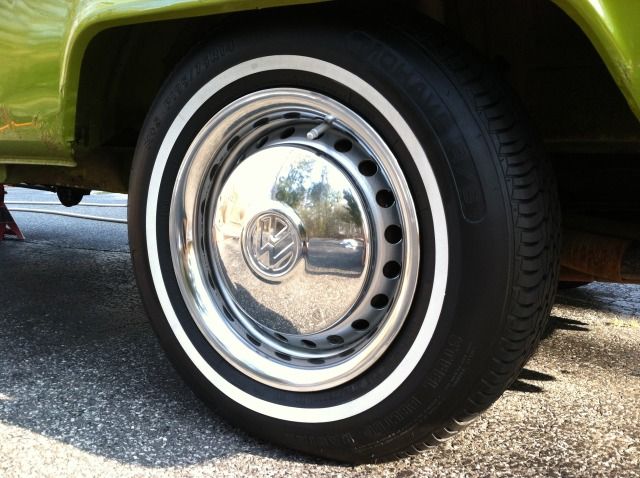
I started by lifting the front of the bus, left it on jackstands and snatched both wheels. I cleaned them down with some degreaser and dishsoap. Once they dried, I masked off the tires, and hit the wheels with a good coat of primer. As the primer dried I started to wax the bus, then occasionally went back to layer on more primer, and eventually a fresh coat of silver. Of course, making my way back to waxing as the layers dried up a bit. After the waxing, I lifted the back of the bus... left it on stands too, and removed both wheels. I again cleaned them, and followed suit with the masking, primer and paint.
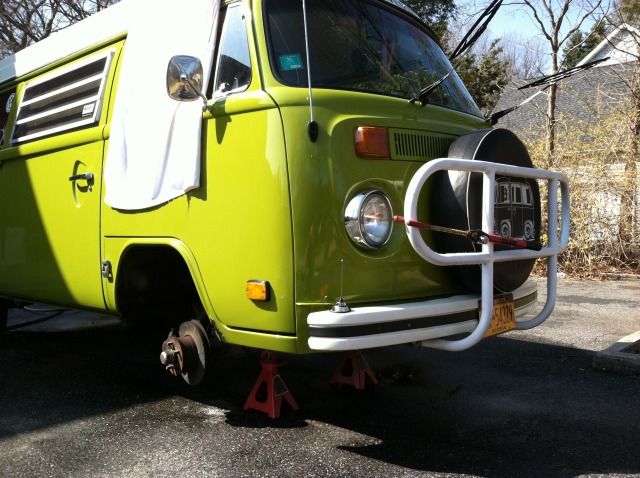

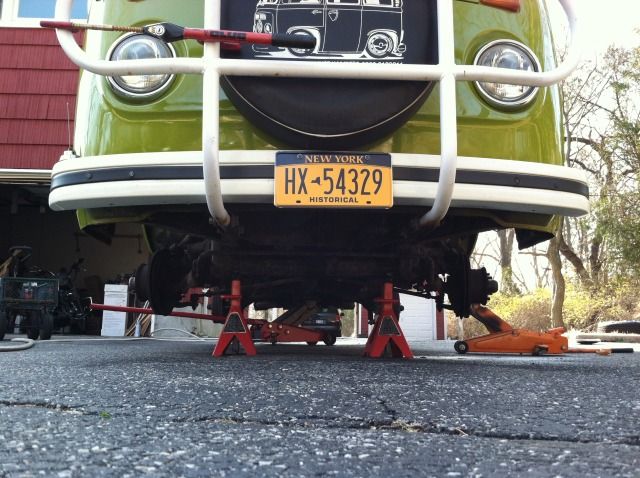

With the wheels off, it was easy to get to the backing plates, and took the opportunity to adjust the brakes. Before eventually moving back over to my now dry set of front wheels. These tires are 3 years old, have no cracks, and it doesnt even look like the treads are wearing, there are still the little wear "nipples" on the sidewalls too... Still, I took the opportunity to rotate the tires. Front to back, and left to right.


I put the wheels back on the bus, and occasionally checked back on the other set to apply more paint. I polished the trim rings and hubcaps, (but will have to pay them some more attention another day, as daylight was running out) Also, I tried masking off the filler valves, but the tape wouldnt stay, so they wound up getting painted over... Ill look to change them out soon.

With the other set of wheels now dry, I put them on the front and lowered the bus back down onto all 4's.


Next up, a friend is going to show me how to weld, and we're gonna tackle that nasty hole in my dogleg.
Started off with a serious wash down. The bus has been sitting (with few exception) since December, it moved the majority of our crap back when we slid across town to the new house and long since has deserved a scrub. After drying the bus, I decided it was too nice to go inside; so I decided to hop on a few small chores.
I started by lifting the front of the bus, left it on jackstands and snatched both wheels. I cleaned them down with some degreaser and dishsoap. Once they dried, I masked off the tires, and hit the wheels with a good coat of primer. As the primer dried I started to wax the bus, then occasionally went back to layer on more primer, and eventually a fresh coat of silver. Of course, making my way back to waxing as the layers dried up a bit. After the waxing, I lifted the back of the bus... left it on stands too, and removed both wheels. I again cleaned them, and followed suit with the masking, primer and paint.
With the wheels off, it was easy to get to the backing plates, and took the opportunity to adjust the brakes. Before eventually moving back over to my now dry set of front wheels. These tires are 3 years old, have no cracks, and it doesnt even look like the treads are wearing, there are still the little wear "nipples" on the sidewalls too... Still, I took the opportunity to rotate the tires. Front to back, and left to right.
I put the wheels back on the bus, and occasionally checked back on the other set to apply more paint. I polished the trim rings and hubcaps, (but will have to pay them some more attention another day, as daylight was running out) Also, I tried masking off the filler valves, but the tape wouldnt stay, so they wound up getting painted over... Ill look to change them out soon.
With the other set of wheels now dry, I put them on the front and lowered the bus back down onto all 4's.
Next up, a friend is going to show me how to weld, and we're gonna tackle that nasty hole in my dogleg.
-
Glenn

- Posts: 3207
- Joined: Tue Sep 09, 2008 4:20 pm
- First Name: Glenn
- Vehicle Year: 1974
- Model: Beetle
- Location: Long Island, New York, USA
- Contact:
Re: Home away from Home, on wheels.
Looks great.
Sure glad you use "The Club" on the Bay. Sure wouldn't want anyone to steal it when the wheels are off
Sure glad you use "The Club" on the Bay. Sure wouldn't want anyone to steal it when the wheels are off
Glenn
74 Beetle Specs | 74 Beetle Restoration | 2180cc Engine
"You may not get what you pay for, but you always pay for what you get"
When you mess with the bull, you get the horns.
74 Beetle Specs | 74 Beetle Restoration | 2180cc Engine
"You may not get what you pay for, but you always pay for what you get"
When you mess with the bull, you get the horns.
-
ObnoxiousBlue
- Site Admin
- Posts: 1422
- Joined: Tue Sep 09, 2008 5:23 pm
- First Name: Mike
- Vehicle Year: 1964
- Model: Beetle
- Location: Above ground...
- Contact:
Re: Home away from Home, on wheels.
Always looking to safeguard my investment!
-
AoT
- Posts: 1029
- Joined: Fri Oct 17, 2008 8:09 pm
- First Name: Audrey
- Vehicle Year: 1974
- Model: Beetle
- Location: Ready for a road trip....
Re: Home away from Home, on wheels.
Peabody is looking sharp for the season. that coat of paint on the wheels really pops. Nice!
Great driveway for doing some car work.
Great driveway for doing some car work.
Keep working at it and it gets done!!
Re: Home away from Home, on wheels.
Nice to see you back in the game bud! What a difference.... i never even realized that your wheels needed some love.
Can we talk about the new place here a second.... am I seeing a 3 car garage total and a carport?????? Looks like you might need a new toy!
Also, I think best practice is not to flip flop side to side when rotating tires. They need to stay in correct rotation so right side stays on right side. That being said..... I get them mixed up all the time on my drivers as I swap out summer for winter shoes, and kick myself for not marking them last season. Oh well. Ish happens.
Glenn wrote:I have to say, this "gruppe" is so much more than just a car club.
MrBreeze wrote: This is the DVG board. The threads flow as they flow.
Deal with it.
-
ObnoxiousBlue
- Site Admin
- Posts: 1422
- Joined: Tue Sep 09, 2008 5:23 pm
- First Name: Mike
- Vehicle Year: 1964
- Model: Beetle
- Location: Above ground...
- Contact:
Re: Home away from Home, on wheels.
Thanks Raj, they were literally washed clean of paint in some areas. It was a few years worth of washing, so hopefully I wont have to do this again for a few years.
New place is nice, huge property, I get the 2 car attached garage. The carport is technically for a small apartment above the house, but its vacant and I dont see anyone moving in any time soon...Big circular driveway, and lots o room.
There is a baja in the garage already, but he wants it gone. Id be into it if it were a full bodied beetle, but Im not a baja guy. Its a 68 if you know anyone interested...
I looked at the treads on the tires, thinking that it may effect the water run off or maybe the tread was angled to run in one direction... But it wasnt in either case. So I guess Im ok. But frankly, none of the tires even look like theyve been driven on. They must be made of concrete or something.

Re: Home away from Home, on wheels.
Mike nice job. Take a look at the local parts store. They have chrome sleaves with chrome caps that fit right over the valve stems. I'm sure that would be right up your alley. I put them on my little trailer.
-
ObnoxiousBlue
- Site Admin
- Posts: 1422
- Joined: Tue Sep 09, 2008 5:23 pm
- First Name: Mike
- Vehicle Year: 1964
- Model: Beetle
- Location: Above ground...
- Contact:
Re: Home away from Home, on wheels.
My 10 minute headlight change, turned into an hour long ordeal. Started by simply WASHING the bus. Turned into, vaccum, and spray wax... Then, new wipers, and forgot! My drivers high beam was out.
Went to Pep Boys, and got the needed parts, two new bulbs, and a fresh set of wiper blades...
Installed the bulb, and 1) It rocked in the bucket, so I had to bend in the adjuster frame a little bit to make for a more snug fit. Then 2) the damn high beam still doesn't work! What might I be missing? I checked fuses, but nothing 'appears' blown. I also have to go check TS as I dont know which fuse might control ONLY the drivers high beam... IDK
Input anyone?
-
ObnoxiousBlue
- Site Admin
- Posts: 1422
- Joined: Tue Sep 09, 2008 5:23 pm
- First Name: Mike
- Vehicle Year: 1964
- Model: Beetle
- Location: Above ground...
- Contact:
Re: Home away from Home, on wheels.
NVM. Owners manual says fuse 5 runs the drivers high beam, and the indicator light. I just checked, and I have no indicator light. So I'm going to guess its the fuse, or a bad contact on the fuse side of the circuit. Since the passenger side is working (and it is on a different fuse line) I know the high beam switch is working.
-
BusBq Bill

- Posts: 310
- Joined: Thu Jul 09, 2009 9:33 pm
- First Name: Bill
- Contact:
Re: Home away from Home, on wheels.
Double check the connector at the headlight, should be 3 wires, i bet its the connection on the high beam terminal. probably corrosion ..
"I will be Setting aside my trusty can of starter fluid"ObnoxiousBlue wrote: quickly diagnosed as a break in the wire, and in no more than a twiddle of his finger Peabody and I took it back to the pavement
Re: Home away from Home, on wheels.
Wow. It's nuts that thy have a separate fuse for each side hi beam. Damn bay! Jk
Glenn wrote:I have to say, this "gruppe" is so much more than just a car club.
MrBreeze wrote: This is the DVG board. The threads flow as they flow.
Deal with it.
-
ObnoxiousBlue
- Site Admin
- Posts: 1422
- Joined: Tue Sep 09, 2008 5:23 pm
- First Name: Mike
- Vehicle Year: 1964
- Model: Beetle
- Location: Above ground...
- Contact:
Re: Home away from Home, on wheels.
Got the headlights all straightened out today. I replaced the fuse for the drivers side, and apparently in doing so, knocked the fuse for the passenger side, and broke the connection. So I fixed that too 
I guess I shoulda checked my fuses before running out to buy new headlight bulbs... Those thing's cost me $40!
Then moved on to repainting my Roos... I REALLY want them powdered, but Action wanted serious buck, and if I spend any more unnecessary money on the bus, I fear Glenn might kick me out of the gruppe!
Also pulled the baja out of the garage, got to seeing what it needs to be a runner... That's the next project!
-
ObnoxiousBlue
- Site Admin
- Posts: 1422
- Joined: Tue Sep 09, 2008 5:23 pm
- First Name: Mike
- Vehicle Year: 1964
- Model: Beetle
- Location: Above ground...
- Contact:
Re: Home away from Home, on wheels.
UPDATE: Painting the roo was a disaster... Anyone know how I can strip spray paint from them?
-
Big_kid
Re: Home away from Home, on wheels.
Baja? What'd I miss?
Roo Bars- stripper or sandpaper, unless you know someone with a blast cabinet.
Roo Bars- stripper or sandpaper, unless you know someone with a blast cabinet.
-
ObnoxiousBlue
- Site Admin
- Posts: 1422
- Joined: Tue Sep 09, 2008 5:23 pm
- First Name: Mike
- Vehicle Year: 1964
- Model: Beetle
- Location: Above ground...
- Contact:
Re: Home away from Home, on wheels.
HAHA Hi there Charlie! My buddy Ian has a baja, that he lost interest in some while ago. It's now taken residence in the garage at our new house. He teeters on selling it, keeping it, selling it, keep... well, you get the idea. He's told me many a time to just "take the car" we had it running two summers ago, I don't forsee it needing too too much to get it back on the road. It has been in a heated garage after all...
I bought some chemical stripper and a few abrasive scotch pads tonight, I'm going to brush some on to soak before going to brunch with the family and a few friends... Fingers crossed it works! I saw some rust remover/etch primer I might go back and grab just to clean up some surface rust thats on the underside of the roos... 2 years on already, theyve taken a beating!
I bought some chemical stripper and a few abrasive scotch pads tonight, I'm going to brush some on to soak before going to brunch with the family and a few friends... Fingers crossed it works! I saw some rust remover/etch primer I might go back and grab just to clean up some surface rust thats on the underside of the roos... 2 years on already, theyve taken a beating!
-
Brown
- Posts: 653
- Joined: Sun Sep 14, 2008 8:13 pm
- First Name: Ken
- Location: South Shore of Nassau County
Re: Home away from Home, on wheels.
Sorry for my ignorance, but what is a Roo???
If you need any help with the Baja, I'd be happy to help!!!
If you need any help with the Baja, I'd be happy to help!!!
"THE BLEEDER"
-
ObnoxiousBlue
- Site Admin
- Posts: 1422
- Joined: Tue Sep 09, 2008 5:23 pm
- First Name: Mike
- Vehicle Year: 1964
- Model: Beetle
- Location: Above ground...
- Contact:
Re: Home away from Home, on wheels.
Not ignorance Ken,
Roo's= Roo bars... the white brush guards on the front of my bus
Maybe I'll have a lil tech session to get the bug going!
Roo's= Roo bars... the white brush guards on the front of my bus
Maybe I'll have a lil tech session to get the bug going!
-
Brown
- Posts: 653
- Joined: Sun Sep 14, 2008 8:13 pm
- First Name: Ken
- Location: South Shore of Nassau County
Re: Home away from Home, on wheels.
gotcha! That would be a pain to paint...anything round like that!ObnoxiousBlue wrote:Not ignorance Ken,
Roo's= Roo bars... the white brush guards on the front of my bus
Maybe I'll have a lil tech session to get the bug going!
Tech Session is a great idea!
"THE BLEEDER"
Re: Home away from Home, on wheels.
Mike, start up a build thread on the Baja and post some pics. Maybe some of us have the parts you need to get her back on the road.
Glenn wrote:I have to say, this "gruppe" is so much more than just a car club.
MrBreeze wrote: This is the DVG board. The threads flow as they flow.
Deal with it.
-
ObnoxiousBlue
- Site Admin
- Posts: 1422
- Joined: Tue Sep 09, 2008 5:23 pm
- First Name: Mike
- Vehicle Year: 1964
- Model: Beetle
- Location: Above ground...
- Contact:
Re: Home away from Home, on wheels.
SO, I'm takin numbers and kicking ass lately.
Messed up uber bad on the roo's last night. Thats what I get for rushing and trying to just pass off with "one more coat of krylon"
Wen't out last night and bought some paint stripper:
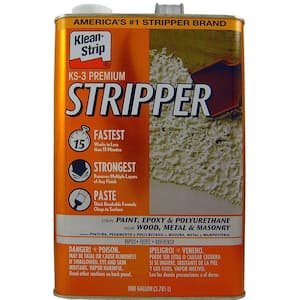 I was originally told by some friends on Vortex to use "aircraft stripper" but the local shops didnt have it (later found out PepBoys did! d'oh!)
Let the roo's sit over night for that last crappy coat of white to cure, then woke up early today to lay on the first of what was eventually 5 coats of stipper. The first layer stayed on for about 2 hours while we were at brunch, and it did work. It took off alot of the old paint, and left only a few stubborn areas. I layered on some more stipper, let it bubble and worked it with a wire brush and an abrasive 3M pad. After a few light touches to get the last of the white out from the weld beads and mounting hardware I hit the bars with a wire wheel on the hand drill, just to break some of the surface rust that was forming under the paint.
I washed the bars with dish soap, and a degreaser to remove any crud that was still on them. Then hit it with an etching primer. Again, some friends suggested I use an etching primer because there was some surface rust on the bars. After the etching primer a few light coats of regular Rustoleum primer went on. Im just finishing up now, but I bought "heavy duty" Rustoleum for the top layers of white. I chose gloss white of course, but if the label does what it says the paint is forumlated to resist chipping and abrasion.
We'll see... pix when done.
Messed up uber bad on the roo's last night. Thats what I get for rushing and trying to just pass off with "one more coat of krylon"
Wen't out last night and bought some paint stripper:
I was originally told by some friends on Vortex to use "aircraft stripper" but the local shops didnt have it (later found out PepBoys did! d'oh!)Let the roo's sit over night for that last crappy coat of white to cure, then woke up early today to lay on the first of what was eventually 5 coats of stipper. The first layer stayed on for about 2 hours while we were at brunch, and it did work. It took off alot of the old paint, and left only a few stubborn areas. I layered on some more stipper, let it bubble and worked it with a wire brush and an abrasive 3M pad. After a few light touches to get the last of the white out from the weld beads and mounting hardware I hit the bars with a wire wheel on the hand drill, just to break some of the surface rust that was forming under the paint.
I washed the bars with dish soap, and a degreaser to remove any crud that was still on them. Then hit it with an etching primer. Again, some friends suggested I use an etching primer because there was some surface rust on the bars. After the etching primer a few light coats of regular Rustoleum primer went on. Im just finishing up now, but I bought "heavy duty" Rustoleum for the top layers of white. I chose gloss white of course, but if the label does what it says the paint is forumlated to resist chipping and abrasion.
We'll see... pix when done.
-
AoT
- Posts: 1029
- Joined: Fri Oct 17, 2008 8:09 pm
- First Name: Audrey
- Vehicle Year: 1974
- Model: Beetle
- Location: Ready for a road trip....
Re: Home away from Home, on wheels.
Looks like you'll have a new roo! Keep it up Mike
Keep working at it and it gets done!!