Page 25 of 46
Re: Home away from Home, on wheels.
Posted: Sun Jan 06, 2013 11:18 am
by ObnoxiousBlue
Was contemplating doing the bottom roller today. The main focus of my project was the slider hinge, and I'm almost satisfied I found that the "spring lever" was jammed. Now, at least I have a reason I suspect as to why my doo stopped popping off the body. The hinge, roller assembly and the door I step are sill off getting refinished. I was hoping to have the parts all back already, but I can't argue with free chrome (and its always been nicer than the stuff I paid to have refinished at the shop in Brooklyn.)
I was reading up on how to remove, rehab, and reassemble the bottom roller. Which looks REALLY simple. I was going to try and do that today, but I'm going to hold off until the alder hinge is back on. The bottom roller won't require any paint or chrome work. More importantly, if I remove the bottom roller now, the whole door will need to come off (there's only three points that hold the slider to the body) and I don't want to get involved with having to align the door if it comes all the way off.
So, we wait.
I could clean the tracks...
Re: Home away from Home, on wheels.
Posted: Sun Jan 06, 2013 8:32 pm
by ObnoxiousBlue
JUST picked my parts up, the chrome looks FANTASTIC. This thing gleams, it's likely to be the nicest slider hinge in the North East! I can't wait to win the coveted "shiniest slider hinge" award at the shows this year!

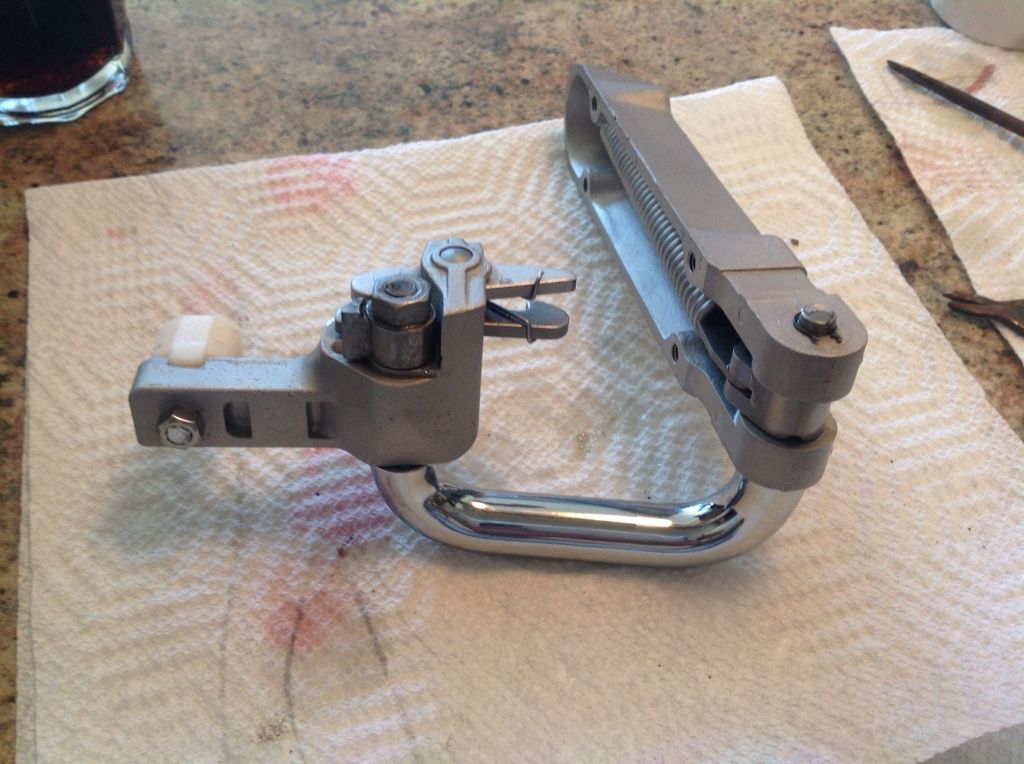
I'm just checking on the orientation of the "almond shaped lock" at the hinge end of the spring, and the other one on the roller. I see that they each have a square hole to interlock with the hinge itself, but I'm just making sure that mine was set up right before.
Here's the "before" below, does everything seem correct?


The "spring levers" were a bit snug, the bottom one moved pretty freely, but the top one took some effort. I dripped a bit of oil onto it, and it broke loose pretty good, but I'm soaking it now in some fresh oil just to help it out.

Tom, can you maybe shoot a pic of your hinge on the bus, so I can see things in their "assembled" position as they are with tension behind them?
Re: Home away from Home, on wheels.
Posted: Sun Jan 06, 2013 8:48 pm
by AoT
Peabody is certainly getting the royal treatment these days, looking sharp!
Re: Home away from Home, on wheels.
Posted: Mon Jan 07, 2013 9:02 am
by Tom
Mike, I haven't recieved the hinge yet, expecting it today.
Re: Home away from Home, on wheels.
Posted: Mon Jan 07, 2013 3:48 pm
by ObnoxiousBlue
Today was the big day. I wiped the parts down once more just to remove the oil from the slider assembly's overnight soak. Both levers now move and return freely.
I used a 6mm x 30mm machine screw to hold on the new guide block.i probably could've used one a bit longer but this has plenty of "grab" and the nut on the back comes nowhere near any of the bus.

From my "before" photos I was able to figure out the orientation of the spring's "lock nut" the pear shaped part an the end that intercedes with the hinge itself.

I did the same with the roller assembly.
Next, I took it out to the bus, cleaned the tracks with some degreaser and wiped it down with some oil.
I assembled it to the door, and then the track itself.

I oiled the points indicated on Itinerant VW and gave it a run. It feels great!
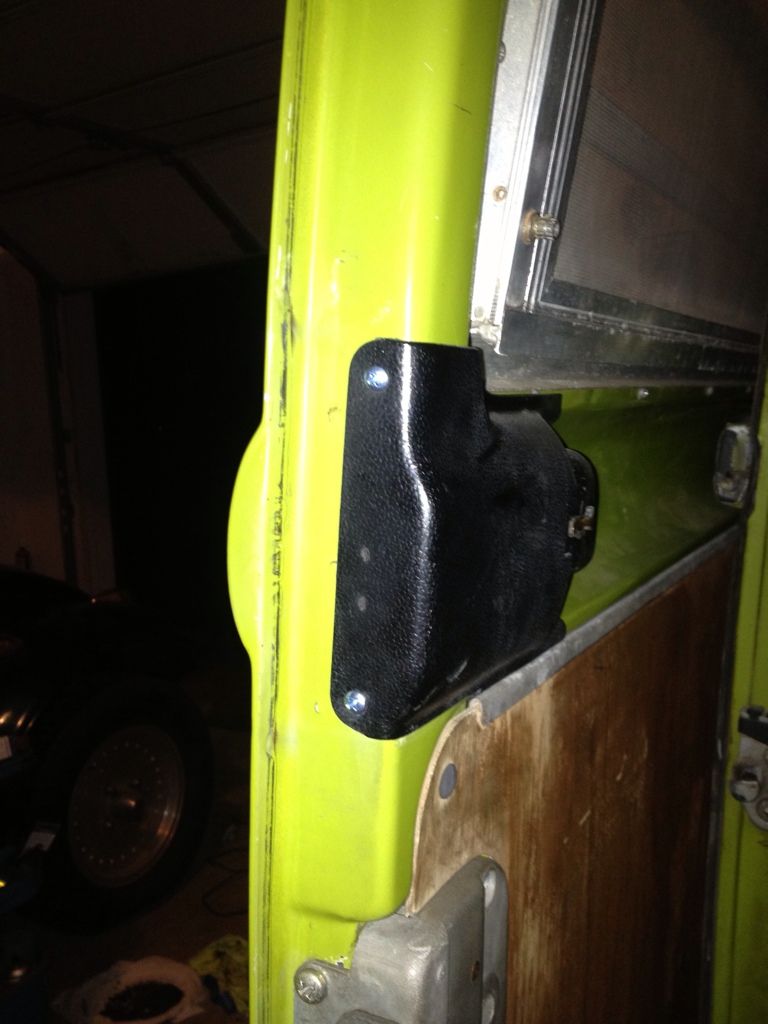
I do notice that there is a bit 16th-8th" "drop" when the hinge takes the weight of the door. At that same time, I notice a "gap" forms under this piece:

Should there be a washer there? (Previously, there was not)
Also, I notice as the roller assembly passes the opening in the track that's intended for removing the door, it "skips" a bit. Is this normal? (I'm inclined to say no) here's a video showing:
http://i256.photobucket.com/albums/hh18 ... 8BD0EC.mp4
Does anyone know hat size screws hold in the plastic covers?

And lastly, is there a "trick" to getting the track cover back on? Lol
I was also pointed to the missing a screw from the rear door latch... I'll have to add that back too.
Re: Home away from Home, on wheels.
Posted: Mon Jan 07, 2013 5:35 pm
by AoT
new hardware looks good. hope you can figure out what s missing!
Re: Home away from Home, on wheels.
Posted: Mon Jan 07, 2013 7:13 pm
by ObnoxiousBlue
Well, I figured I couldn't go wrong with a trip to the hardware store. I did manage to find both size screws that I needed. I also learned why I needed countersink screws... See, I had taken the screw which remained on the bottom of the rear odor latch, and in its place I put one of the machine head screws from the front. Just to hold it in place... I went to close the door and quickly realized that the countersink screws are meant to align trot the screw but rather position the latch assembly in the correct place.

Both front and rear trim got new screws.
I also, did a bit of pondering (the type where a lightbulb instantly came on in my head) and realized, that there couldn't possibly be a washer under the "pear/teardrop" shaped check on the roller... It has a square shaft! I did realize that I was able to give it a bout 3/4 turn still with the ratchet, and now also realize that a bit of "play" might be necessary to allow the door to close and the rear latch to secure the door... Just a thought, looking forward to what you guys think.
All I need to do now, is get the cover back on. That seems to be a bit more of a trick than I thought it to be. I was going to have it repainted and the belt line "bump" under the air vent touched up. I chipped it ever so slightly when I took the cover and the old rubber seal off (it was painted in place) but it really is very minute so I may wait till spring.
Re: Home away from Home, on wheels.
Posted: Mon Jan 07, 2013 7:22 pm
by Brown
That mechanism looks outstanding! Great job Mike!
Re: Home away from Home, on wheels.
Posted: Mon Jan 07, 2013 9:44 pm
by Big_kid
OOH! SHINY OBJECTS!
I like shiny objects!
Re: Home away from Home, on wheels.
Posted: Mon Jan 07, 2013 9:54 pm
by Glenn
Nice job Mike.
The devil is in the details and little projects are just as rewarding as big ones.
Re: Home away from Home, on wheels.
Posted: Tue Jan 08, 2013 9:46 pm
by ObnoxiousBlue
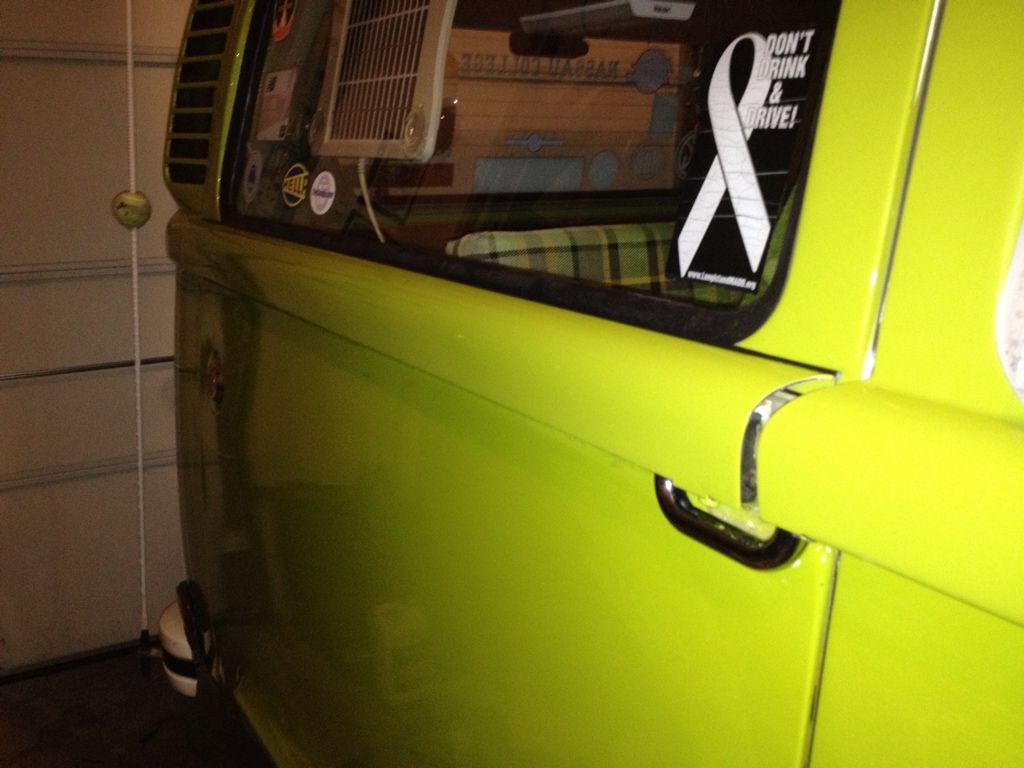
Wrapped up my project today. I'm very pleased with how it came out in the end.
It took me a little bit to figure out the best way to get the track cover back on, I knew that I had to start it at he front and work it towards the back. But getting it lined up right took a little finesse. It was also quite a task to get the cover on, in the correct place, with the new rubber beading properly seated.
Once the track cover was fit in place, I gave the sliding door a couple slow and gentle test runs to see if the door cleared the track. I did find that now with a new guide bushing in place, the roller assembly sits a bit higher (as its supposed to) and as such the shoulder of the arm actually did rub a bit. So as told on ItinerantVW I just gave the track cover a good tug to bend it out just a bit, now it rides smooth with no rubs. The track, is lubricated (as the manual suggests) with motor oil and now that I actually know and an see the ports on the bearing and roller that need to be oiled I don't anticipate any issues. The door is working great and looked even better.
Once that was done, I cut out the old rear side window. The seal had a tear in it and cracks at the edges. I cleaned the window, and used a razor to scrape off crud that had dried and left a line from around where the old seal. I know some people like to we soap or lotion to help work the seal onto the window but I did it dry. I worked it and every few inches I put some blue tape over the seal to keep it from peeling off. Next, I worked some nylon rope to the fold where the window seals into the body. I went twice around the window as I had read online. Last time I did this, I only went once and had no issues but this time it clearly came out better. I went back to the garage and sprayed the window seal down with some simple green to help it slide into place. My dad stood and supported the window from the outside pushing and "banging" on the edges as I slowly pulled the roping out from within the bus. I found, that while the first pass got the seal over the flange in the body the second pass really helped the window to secure in place and gave a better seat.

Re: Home away from Home, on wheels.
Posted: Thu Jan 10, 2013 6:30 pm
by ObnoxiousBlue
Bus is going back to the body shop on Monday morning. Getting the rust under the windscreen taken care of. Also, a small bubble under the rear window on the hatch. This "mild winter" is playing well in my favor. Will be replacing both window seals when it's time to put the window back in.
Aud, you're welcome to join... All it takes is a couple feet of nylon roping! If you're really efficient, a bit of simple green, some blue tape, and the nozzle from a bottle of glue,

Re: Home away from Home, on wheels.
Posted: Fri Jan 11, 2013 6:44 pm
by ObnoxiousBlue
Can someone give me an idiots step-by-step on timing?
I have a stock distributor for my bus that a friend whom knows distributors well went through for me to ensure it was functioning. I'd like to put it in my bus but don't know entirely how.
Any help on how-to would be most appriciated!
Re: Home away from Home, on wheels.
Posted: Sat Jan 12, 2013 6:08 pm
by Raj
any luck mike? I think the t4 is a little different than the t1..... if not, i can walk you through the process.
Re: Home away from Home, on wheels.
Posted: Thu Jan 17, 2013 8:09 pm
by ObnoxiousBlue
I got a new book
Soon, a respectable set of tools to keep in the bus... The crap I have is missing pieces and its frustrating.

Re: Home away from Home, on wheels.
Posted: Fri Jan 18, 2013 9:47 am
by Raj
ObnoxiousBlue wrote:I got a new book
Soon, a respectable set of tools to keep in the bus... The crap I have is missing pieces and its frustrating.
Nice mike. Amongst your travels, try to find a used one too..... the used one can be used when you down in the trenches under the bus, w/o the fear of getting your grimmy mitts all over it. I keep the 'clean' ones for reading material by my 'throne'
Re: Home away from Home, on wheels.
Posted: Fri Jan 18, 2013 1:35 pm
by EDNCAROL
Long live King Raj! Lol!
Re: Home away from Home, on wheels.
Posted: Fri Jan 18, 2013 1:46 pm
by Glenn
Raj wrote:I keep the 'clean' ones for reading material by my 'throne'
Hope the pages don't get stuck together.
Re: Home away from Home, on wheels.
Posted: Sun Jan 20, 2013 11:22 am
by ObnoxiousBlue
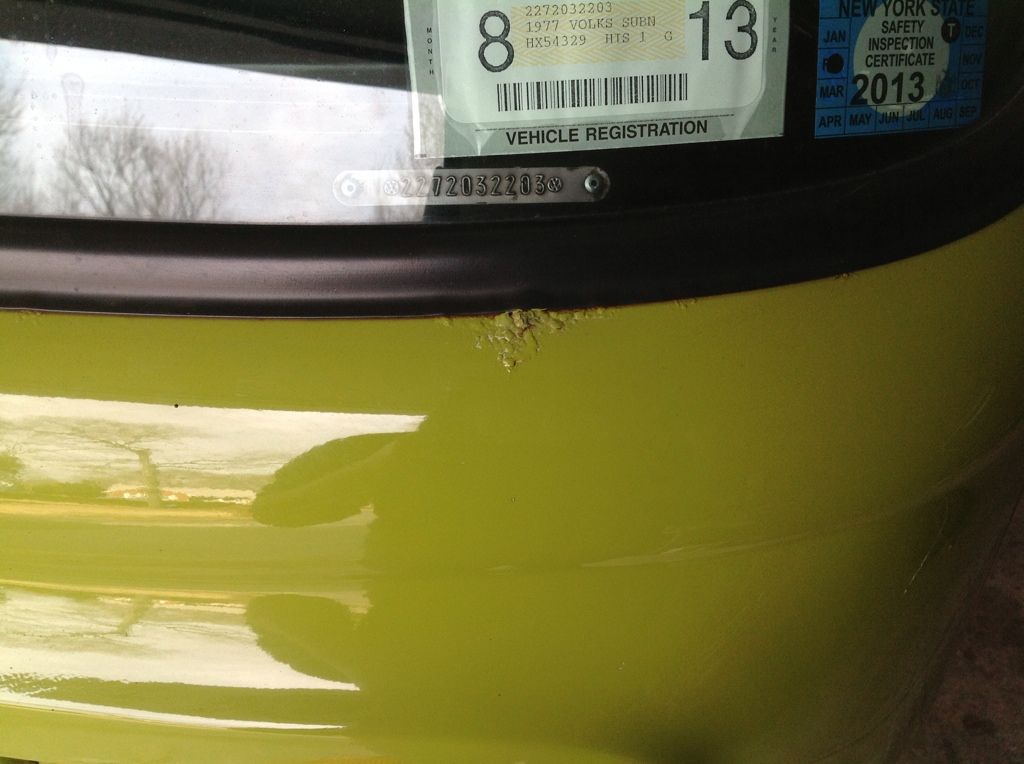
Finally, back to the odd shop tomorrow. Fixing the rust under the windscreen, and a small bubble under the rear window. I will put in the new seals Thursdayish.
The big issue here, is that I don't want the entire nose cut up to replace two, 2" sections. So again, color match will be key. I understand that many people on TS Baywindow thread have said they would rather see the lower part of the opening all cut out and a new welded in. But at the end of the day, this is still my driver and I could spend a lifetime chasing rust.
Pics later.
Re: Home away from Home, on wheels.
Posted: Sun Jan 20, 2013 1:19 pm
by AoT
ObnoxiousBlue wrote:... But at the end of the day, this is still my driver and I could spend a lifetime chasing rust.
I like this line. Going to use it IYDM.
Re: Home away from Home, on wheels.
Posted: Sun Jan 20, 2013 1:31 pm
by ObnoxiousBlue
Be my guest Aud, I wished I'd learned it back when I drove a beetle... I'd still be driving a beetle! I'm going to fix these bubbles, because they are apparent. But I recognize that fixing it means the car will have some filler, and that without doing the whole opening it may be back in a few years. I'll get more love and use from it, but don't need to trigger a whole body repaint or start chasing issues I know will lead me down a dark path.
Fixing the issue, and creating issues are two different issues!
Re: Home away from Home, on wheels.
Posted: Sun Jan 20, 2013 2:38 pm
by ObnoxiousBlue
I know ALOT of buses have nothing on the nose, but I gotta say these things are kinda ugly without the tire up there! Lol though I will admit, the thought briefly crossed my mind about removing the tire and putting an emblem up there... But my Roo is spaced away from the body to clear the tire and I rear it might look odd without a tire...
Looks so wierd, I suppose it's a face only a "mother" could love.
I was happy though that other than a few small bubbles starting under the windscreen, the rest of the nose feels solid. No other marks, the tire carrier feels solid and well supported and the nose doesn't look like it is bowing.


Re: Home away from Home, on wheels.
Posted: Sun Jan 20, 2013 3:01 pm
by 1971SuperBeetle
Mike just wanted to say congrats on the bus. Reaally nice
Re: Home away from Home, on wheels.
Posted: Sun Jan 20, 2013 3:17 pm
by Tom
I'm pretty sure that VW never sold that bracket to attach the spare to the nose, at the end of the day it's what you like that counts. Different strokes for different folks.
Re: Home away from Home, on wheels.
Posted: Sun Jan 20, 2013 3:21 pm
by ObnoxiousBlue
Thanks Scott! It's treats me good.
Tom, I'm sure I'll leave it. Plus, I don't really want to give up the I cabinet space to carry the tire. If the carrier and metal behind it were in bad shape, it would be a different story. I was happy to see everything else seems solid there.
Once it's back from the shop, I'll be doing this:
http://www.thesamba.com/vw/forum/viewto ... er+refresh