AoT's White Wonder

The place to document your restoration, or maintenance of your Vintage VW.
Forum rules
Please recycle your forum, and utilize the same chat for all projects related to a single vehicle.

We recommend a broad title such as your name, car year and model; such that it is applicable to whatever projects you tackle.

For issues related to a vehicle specific part, aftermarket accessories, or replacement parts please include the year, model, and application.

For engine related questions also include your engine size and configuration, along with any upgrades or modifications.
User avatar
Glenn
Posts: 3207
Joined: Tue Sep 09, 2008 4:20 pm
First Name: Glenn
Vehicle Year: 1974
Model: Beetle
Location: Long Island, New York, USA
Contact:

Re: AoT's White Wonder

Post by Glenn »

AoT wrote:Found that the nut that holds the vibrator to the speedo was loose.
Uh..... never mind.
AoT wrote:I don't see another place on the top of the sender for another connection. And where is the ground connection?
It grounds to the tank and then the car body. There are 5 screws, 4 should have a plastic washer and one does not which provides the ground.
Glenn
74 Beetle Specs | 74 Beetle Restoration | 2180cc Engine

"You may not get what you pay for, but you always pay for what you get"

When you mess with the bull, you get the horns.
AoT
Posts: 1029
Joined: Fri Oct 17, 2008 8:09 pm
First Name: Audrey
Vehicle Year: 1974
Model: Beetle
Location: Ready for a road trip....

Re: AoT's White Wonder

Post by AoT »

Glenn wrote:
AoT wrote:I don't see another place on the top of the sender for another connection. And where is the ground connection?
It grounds to the tank and then the car body. There are 5 screws, 4 should have a plastic washer and one does not which provides the ground.
Got it. Thanks.

Guess the info I was reading was for earlier years. Nothing beats getting educated like hands on experience!! :P
Keep working at it and it gets done!!
AoT
Posts: 1029
Joined: Fri Oct 17, 2008 8:09 pm
First Name: Audrey
Vehicle Year: 1974
Model: Beetle
Location: Ready for a road trip....

Re: AoT's White Wonder

Post by AoT »

Glenn wrote:
AoT wrote:Found that the nut that holds the vibrator to the speedo was loose.
Uh..... never mind.
I don't know who makes these names up, but it gets interesting when you put them together! :lol:
Keep working at it and it gets done!!
AoT
Posts: 1029
Joined: Fri Oct 17, 2008 8:09 pm
First Name: Audrey
Vehicle Year: 1974
Model: Beetle
Location: Ready for a road trip....

Re: AoT's White Wonder

Post by AoT »

GA:

Check your PM's!!

:P
Keep working at it and it gets done!!
User avatar
Glenn A
Posts: 385
Joined: Tue Sep 09, 2008 8:20 pm
First Name: Glenn

Re: AoT's White Wonder

Post by Glenn A »

Will do Audrey. Your right rear taillight is out. Sorry we didn't get a chance to fix that too.
AoT
Posts: 1029
Joined: Fri Oct 17, 2008 8:09 pm
First Name: Audrey
Vehicle Year: 1974
Model: Beetle
Location: Ready for a road trip....

Re: AoT's White Wonder

Post by AoT »

Glenn A wrote: Your right rear taillight is out.
Will check on it. Seems to be a recurring loose connection, just need to take the lens off to reset the bulb. I'll put one of the inside housing units on my parts list along with those retainer clips.
Keep working at it and it gets done!!
AoT
Posts: 1029
Joined: Fri Oct 17, 2008 8:09 pm
First Name: Audrey
Vehicle Year: 1974
Model: Beetle
Location: Ready for a road trip....

Re: AoT's White Wonder

Post by AoT »

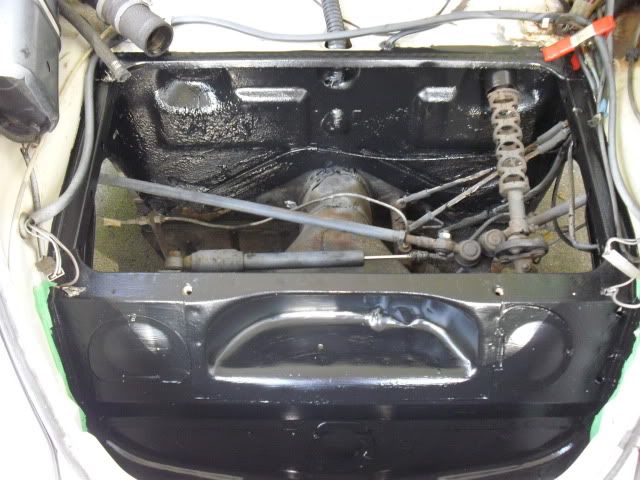
Wanted to resolve some of the issues that i have with the gas line bubbling (possibly hot in the engine comp) and not easy to get a quick restart and noticeable sediment in the gas filter so I decided to move the filter back under the bug and clean out the fuel line.


Image
After getting the gas level down I disconnected all the lines in the engine comp back to the end of the hard line. SHot in some cleaner and gave it a few good doses with the air compressor and got a lot of gunk out. Siphoned out the tank and even had sediment in that batch. Disconnected the lines and removed the fuel tank and went and got the POR tank sealer kit. Went thru the cleaner process about 4 times until the to marine clean was clear. tomorrow will get is sealed and let it set.

Image

Got the fuel lines reconnected back to the hard line and got the wires cleaned up. Just need to get the tank back in and gas it up. Long process but hopefully worth the effort.

Image

GR:No more RED umbrella :lol:
Image
Keep working at it and it gets done!!
User avatar
Glenn
Posts: 3207
Joined: Tue Sep 09, 2008 4:20 pm
First Name: Glenn
Vehicle Year: 1974
Model: Beetle
Location: Long Island, New York, USA
Contact:

Re: AoT's White Wonder

Post by Glenn »

Nice shade...

Good job.
Glenn
74 Beetle Specs | 74 Beetle Restoration | 2180cc Engine

"You may not get what you pay for, but you always pay for what you get"

When you mess with the bull, you get the horns.
User avatar
Raj
Posts: 1935
Joined: Tue Sep 09, 2008 8:03 pm
Location: Long Island, NY

Re: AoT's White Wonder

Post by Raj »

good choice with the POR 15 gas tank kit. I have used it many a time and it works 'wonders'
Glenn wrote:I have to say, this "gruppe" is so much more than just a car club.
MrBreeze wrote: This is the DVG board. The threads flow as they flow.
Deal with it.
AoT
Posts: 1029
Joined: Fri Oct 17, 2008 8:09 pm
First Name: Audrey
Vehicle Year: 1974
Model: Beetle
Location: Ready for a road trip....

Re: AoT's White Wonder

Post by AoT »

Raj wrote:good choice with the POR 15 gas tank kit. I have used it many a time and it works 'wonders'
That's what I need to hear!!
Keep working at it and it gets done!!
User avatar
Glenn A
Posts: 385
Joined: Tue Sep 09, 2008 8:20 pm
First Name: Glenn

Re: AoT's White Wonder

Post by Glenn A »

Nice AoT. Every little bit helps. Is the wonder back in action yet? If not paint everthing under the tank.

Image
AoT
Posts: 1029
Joined: Fri Oct 17, 2008 8:09 pm
First Name: Audrey
Vehicle Year: 1974
Model: Beetle
Location: Ready for a road trip....

Re: AoT's White Wonder

Post by AoT »

Got the gas tank sealed during the week and ordered a screen and gasket to install since the setup wasn't on the wonder. So while waiting for the parts got the space cleanned up a bit.

Washed and painted the exterior of the tank
Image

Image

Image

Used the time to wire wheel the spare tire well since there's alot of rust. Even though the drain holes are open the way the metal slopes on one of the holes it doesn't let the water flow out. Cleaned up the rim of the gas tank opening and gave both a paint.

Image

Image

Image

Image

White waiting for paint to dry got the new vent window seals put on. The new rubber makes them tight to close but they look better. One side needs a little tweaking to get the seal hold tighter.

Image

Image

Nice stop - gas tank in and back on the road!! :roll:
Keep working at it and it gets done!!
User avatar
Raj
Posts: 1935
Joined: Tue Sep 09, 2008 8:03 pm
Location: Long Island, NY

Re: AoT's White Wonder

Post by Raj »

wow.... this is becoming a very nice driver. Good job!
Glenn wrote:I have to say, this "gruppe" is so much more than just a car club.
MrBreeze wrote: This is the DVG board. The threads flow as they flow.
Deal with it.
User avatar
Glenn
Posts: 3207
Joined: Tue Sep 09, 2008 4:20 pm
First Name: Glenn
Vehicle Year: 1974
Model: Beetle
Location: Long Island, New York, USA
Contact:

Re: AoT's White Wonder

Post by Glenn »

Great work... I hoe the paint on the tank is fuel resistant. Otherwise it might peel off over time.
Glenn
74 Beetle Specs | 74 Beetle Restoration | 2180cc Engine

"You may not get what you pay for, but you always pay for what you get"

When you mess with the bull, you get the horns.
User avatar
Glenn A
Posts: 385
Joined: Tue Sep 09, 2008 8:20 pm
First Name: Glenn

Re: AoT's White Wonder

Post by Glenn A »

Lookin good.
mannys66

Re: AoT's White Wonder

Post by mannys66 »

cant wait to see these windows finished, I never did any of this work in any of my cars because I thought it was too difficult.
AoT
Posts: 1029
Joined: Fri Oct 17, 2008 8:09 pm
First Name: Audrey
Vehicle Year: 1974
Model: Beetle
Location: Ready for a road trip....

Re: AoT's White Wonder

Post by AoT »

mannys66 wrote:cant wait to see these windows finished, I never did any of this work in any of my cars because I thought it was too difficult.
Its more of a patience issue than difficult, but if I got it to work than you should be able to breeze through!!

Next is the window scrapers and felt channels. I'll be sure to have the first aid kit handy (and the camera)!! :lol:
Keep working at it and it gets done!!
AoT
Posts: 1029
Joined: Fri Oct 17, 2008 8:09 pm
First Name: Audrey
Vehicle Year: 1974
Model: Beetle
Location: Ready for a road trip....

Re: AoT's White Wonder

Post by AoT »

Finished up cleaning and painting under the tank. After some detours and stupid stuff got the tank back in. Made sure all the hose connections were tight, added some gas and the true test came when I cranked the engine. (Had the fire ext ready just to be safe.) It turned on the first crank. Sounded sweet. Let it run for a few and then took it out to get more gas. Ran like a champ but noticed that the gas gauge has not reappeared from the side to show the level.

Image

Got home and turned the car off. Reseated the sender connection and tried again. Guess what?? Nothing!! The quick no start is still happens.

Tried about 20 mins and then 40 mins, still nothing but after 2 hours it fired up and it was back on the road. Know what I need to do about this.

As far as the sender/gauge. Have the 4 plastic washers and the one copper one on. Cleaned up the copper one. The screws were tricky to line up to get them to grab the holes. does the copper washer need to be in a specific position? The tank is painted under the sender but it was that way before I just painted it. The gauge was working fine since I just tightened up the connection back at the speedometer.

Image

Any ideas on what needs to be done to get the gauge working?
Keep working at it and it gets done!!
User avatar
Glenn A
Posts: 385
Joined: Tue Sep 09, 2008 8:20 pm
First Name: Glenn

Re: AoT's White Wonder

Post by Glenn A »

I recall you saying that you put the gasket between the body and tank. My guess is the tank is no longer grounded. Clean the paint off at one of the tank to body clamps and see if that helps.
User avatar
Glenn
Posts: 3207
Joined: Tue Sep 09, 2008 4:20 pm
First Name: Glenn
Vehicle Year: 1974
Model: Beetle
Location: Long Island, New York, USA
Contact:

Re: AoT's White Wonder

Post by Glenn »

Try grounding the wire to see if the gauge moves. if it does the problem is with the sender. It's possible that the paint is insulating the ground.

As to the starter... does it click or do you get nothing? You can try connecting a second wire to the terminal on the starter and running the wire through the batter grommet and under the rear seat. Then when it won't start you touch the wire to the positive terminal on the battery. This bypasses the ignition switch and simulates a "hot start" relay. If that works all the time then install a relay and move on to the next project.

Call if you need more details.
Glenn
74 Beetle Specs | 74 Beetle Restoration | 2180cc Engine

"You may not get what you pay for, but you always pay for what you get"

When you mess with the bull, you get the horns.
AoT
Posts: 1029
Joined: Fri Oct 17, 2008 8:09 pm
First Name: Audrey
Vehicle Year: 1974
Model: Beetle
Location: Ready for a road trip....

Re: AoT's White Wonder

Post by AoT »

Glenn A wrote:I recall you saying that you put the gasket between the body and tank. My guess is the tank is no longer grounded. Clean the paint off at one of the tank to body clamps and see if that helps.
Wire brushed it down to the bare metal under one clamp and then did a second one....
Image

Image


But it didn't solve the prob. Gauge still not registering. Should I take the foam gasket out from under the tank? I did put a coat of paint under this area so might not make a difference.

Image

Trying to be proactive and create a another issue!! :?
Keep working at it and it gets done!!
User avatar
Glenn A
Posts: 385
Joined: Tue Sep 09, 2008 8:20 pm
First Name: Glenn

Re: AoT's White Wonder

Post by Glenn A »

You could check to see if the tank is grounded with a meter but it looks pretty good. Maybe the sender got messed up pulling it out.
User avatar
Glenn
Posts: 3207
Joined: Tue Sep 09, 2008 4:20 pm
First Name: Glenn
Vehicle Year: 1974
Model: Beetle
Location: Long Island, New York, USA
Contact:

Re: AoT's White Wonder

Post by Glenn »

Remove the wire on the sender and touch it to ground. The gauge should read full. The ignition must be on.
Glenn
74 Beetle Specs | 74 Beetle Restoration | 2180cc Engine

"You may not get what you pay for, but you always pay for what you get"

When you mess with the bull, you get the horns.
AoT
Posts: 1029
Joined: Fri Oct 17, 2008 8:09 pm
First Name: Audrey
Vehicle Year: 1974
Model: Beetle
Location: Ready for a road trip....

Re: AoT's White Wonder

Post by AoT »

Issues with the sender/gas gauge to be continued. Want to replace the shift rod bushing and rear coupler this weekend so I opened the rear cover to see what going on. Noticed no safety wire on the square nut so will be sure to take care of that.

Image

See how things go tomorow!! ;)
Keep working at it and it gets done!!
AoT
Posts: 1029
Joined: Fri Oct 17, 2008 8:09 pm
First Name: Audrey
Vehicle Year: 1974
Model: Beetle
Location: Ready for a road trip....

Re: AoT's White Wonder

Post by AoT »

Today not so good at the moment.

Got all the bolts disconnected upfront and the rear coupler disengaged. Used needle nose pliers to advance the rod out the front which was not bad. After a few phone calls to Mike and GR had no prob getting the bushing greased and back on. After a few maddening attempts got the shift rod back in the support hanger. Starting working the rod back to the rear with the needle nose and was making good progress. When I saw the front of the shift rod I went back to see how it was lining up with the rear coupler and thats when the good times ended. The shift rod is under some hard lines just inside the rear inspection hole and the rod cannot be raised up to catch the other end towards the tranny.

I have tried to advance the rod as i was before to clear the lines and reseat the rod but it won't budge. The end of the rod moves but is not free of the hard lines that are back there. this was an auto stick at one time so not sure if there are extra lines running in the tunnel since this doesn't seem a common issue from other posts I've read.

If anyone has a suggestion or a tool that might move this along please give a holler. An extra pairs of hands is probably needed!! An a cold beer!

Thanks!
Keep working at it and it gets done!!
Post Reply