Page 6 of 11
Re: '73/1500
Posted: Sun May 20, 2012 8:18 pm
by D-A-N
Glenn wrote:the firing order is 1-4-3-2 clockwise. The location of #1 could be different. you need to set the engine up so it's at TDC on #1. Then rotate the distirbutor body so the #1 make is pointed to by the rotor.

Cool....I'll try that out in the daylight tomorrow AM. If we can't figure it out in the morning, we're going to have to get it towed to GT b/c this car has overstayed its welcome in Bay Shore AND we have a 69 Squareback roller coming here in about a week.
Any insight though into that alternator thing in the pic above?
Anyone....Bueller?
Re: '73/1500
Posted: Sun May 20, 2012 9:26 pm
by Glenn
No idea on the terminal... I never had to deal with anything like that before.
Re: '73/1500
Posted: Mon May 21, 2012 12:17 pm
by Brown
Take it one step at a time.
Are you getting spark?
Are you getting Fuel?
if you have those two things then you should get something a sputter etc.
Go down to Condition 3 and step through it. you've come this far don't give up now!!!
http://www.vw-resource.com/car_wont_start.html
Re: '73/1500
Posted: Mon May 21, 2012 1:21 pm
by D-A-N
Brown wrote:Take it one step at a time.
Are you getting spark?
Are you getting Fuel?
if you have those two things then you should get something a sputter etc.
Hey Brown, how's it going?
This morning we tested the coil and had a nice bright white/blue spark. We also swapped out the fuel pump pushrod for a new one and since that didn't change anything, we swapped fuel pumps but nothing doing there either.
The spark plug wires were the same ones from the engine that was driving us around so I don't suspect them and we didn't do anything to the plugs since the engine ran at Raj's house. The points were gapped at .016 and the entire distributor is rebuilt from Glenn so that's all good.
When the engine was turning over there were no weird sounds of compression leaking and we cranked enough to build up oil pressure as the oil light went off.
But we did do three 10+ hour days so maybe we just did something dumb like mis-wired something.
Since I had to get out of LI for an appointment in Flushing AND we promised my cousin to have our car gone by today so he could work on his car before our Squareback arrives, we had to have it towed to Tony's.
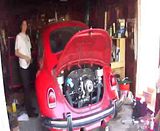
Here it was yesterday at first start attempt. Nothing like that sinking feeling after putting in a bunch of work and nothing happens. It never got better than this:
Re: '73/1500
Posted: Mon May 21, 2012 1:27 pm
by Brown
Understood, you'll get it though! All that hard work will not be for nothing!!!
Re: '73/1500
Posted: Mon May 21, 2012 1:49 pm
by Raj
Sorry I missed all this action. I was in your neck of the woods Sat at the Shmorgus- burg and then that crazy ass meatball place. Yum.
For next tine, a good trick with the motor install is to havethe e brake off and rear wheels free. Put it in geer and block one wheel. While sliding the motor in, slowly rotate the other wheel, turning the spline inside. Works every time..... ( next time!)
Anyway.
-Was the dizzy properly seated into the case? I have done that before
- If the car didnt go to tony's yet.... let me know.
Good work anyway guys.
Re: '73/1500
Posted: Tue May 22, 2012 7:59 am
by D-A-N
Raj wrote:Sorry I missed all this action. I was in your neck of the woods Sat at the Shmorgus- burg and then that crazy ass meatball place. Yum.
For next tine, a good trick with the motor install is to havethe e brake off and rear wheels free. Put it in geer and block one wheel. While sliding the motor in, slowly rotate the other wheel, turning the spline inside. Works every time..... ( next time!)
Anyway.
-Was the dizzy properly seated into the case? I have done that before
- If the car didnt go to tony's yet.... let me know.
Good work anyway guys.
I didn't catch this yesterday since we were emailing.
To finally get the motor in, I pushed while Jessica rotated the pulley at the alternator. Then it just kind of slid on.
The last big PITA with getting the motor in was lining up the long half-moon headed bolt by the starter with the hole in the case. It was a few cm's off and took a while to line up just right. After that though, all was good.
On another note, I have a cosmetic/function question.
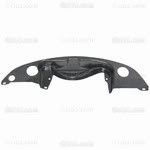
I have the heat risers blocked off on the new muffler but I have the old rear tin w/ heat riser cutouts. Do I just let the blocked off part poke into the engine bay? If so, with or without the two small insulated heat riser tins? It looks ugly either way but will it cause problems w/ excessive heat in the engine compartment?
Or should I just buy this which has no holes for the heat risers? It's VW of Mexico stuff.
Re: '73/1500
Posted: Tue May 22, 2012 9:06 am
by Raj
I have a funny feeling that the ' new ' tin will not fit correct because it will hit the heat riser block off plates' bolt heads. Once you install the stock tin, draw a hypothetical straight line across the tin , pretending as if the provision wasn't there. Would it clear?
Re: '73/1500
Posted: Wed May 23, 2012 6:33 am
by D-A-N
Well, good thinking Raj, it seems like your hunch is right.
I did a little reading and apparently my idea would work only if the heat risers are cut off the muffler and the holes are welded back up. I'm not so worried about the look of things to go through all that at the moment but maybe if I have occasion to take the muffler off I'll do it.
Haven't heard any news about the car yet. Hopefully today.
Re: '73/1500
Posted: Wed May 23, 2012 7:04 am
by Glenn
Dan,
I saw the car at GT yesterday. They had it running and Wayne fixed the alternator.
I would leave the breast tin and just put the small tins that close off the stock heat risers off to reduce the size of the hole. What you really need to do is plug the large 2" hole in the tin from the pre-heat tube that used to go to the old air cleaner. You can get plugs at Home Depot, but duct tape will work in the meantime.
The car looks good and i'm sure they just need to tune it up and you'll be ready.
If you want to buy a new piece this is what you need.
http://cbperformance.com/catalog.asp?ProductID=272

Re: '73/1500
Posted: Wed May 23, 2012 7:19 am
by D-A-N
Glenn....thanks for the update. I can't wait to get the thing back.
You didn't happen to catch what the reason for it not starting was did you?
To plug the holes for the valve cover vent hoses the PO put in the bellhousing tin I was able to use a washer on either side with a screw and a nut but those were small holes. What are you thinking of that HD sells in terms of plugs?
Re: '73/1500
Posted: Wed May 23, 2012 8:11 am
by AoT
D-A-N wrote:
.... What are you thinking of that HD sells in terms of plugs?
If you're looking to close those 2" holes I got round metal 2" plates in the electrical dept at HD. They have tabs on the underside that can be bent to hold it in place. I can take a pic if you need.
Re: '73/1500
Posted: Wed May 23, 2012 8:25 am
by D-A-N
AoT wrote:D-A-N wrote:
.... What are you thinking of that HD sells in terms of plugs?
If you're looking to close those 2" holes I got round metal 2" plates in the electrical dept at HD. They have tabs on the underside that can be bent to hold it in place. I can take a pic if you need.
A pic would be great if you don't mind....w/o being able to picture exactly what I'm looking for I'm prone to wander Lowes and Home Depot convincing myself of all the new tools and unnecessary hardware I suddenly "need" to buy.
Re: '73/1500
Posted: Thu May 24, 2012 2:54 pm
by AoT
D-A-N wrote:
A pic would be great if you don't mind....w/o being able to picture exactly what I'm looking for I'm prone to wander Lowes and Home Depot convincing myself of all the new tools and unnecessary hardware I suddenly "need" to buy.
Dan:
I clarified with Glenn that its not the 2" holes that the hoses go thru the tin from the shroud that you need to close up so what I was recommending was moot.
Glad to hear its running!!
Re: '73/1500
Posted: Thu May 24, 2012 8:24 pm
by ObnoxiousBlue
Dan, I'm not saying its right... But I have seen these
PVC inserts used to block off the holes. Home Depot carries them in assorted sizes.
Re: '73/1500
Posted: Fri May 25, 2012 7:42 am
by D-A-N
ObnoxiousBlue wrote:Dan, I'm not saying its right... But I have seen these
PVC inserts used to block off the holes. Home Depot carries them in assorted sizes.
Thanks for that link....as long as those things can take a coat of black paint and tolerate the heat of being that close to the heat riser I'm down with them.
Re: '73/1500
Posted: Fri May 25, 2012 8:54 am
by AoT
This is the item I used. Metal with tabs to bend to lock into place. These are in to electrical section and should be fine with heat and paint!
http://www.homedepot.com/h_d1/N-5yc1v/R ... reId=10051
Whatever works for you!!
Re: '73/1500
Posted: Fri May 25, 2012 8:16 pm
by D-A-N
Ok....so we got the car back today. Seems that the reason it wouldn't start is because we were being too gentle with it and needed to keep trying to start it over and over until fuel got to the carbs. I guess next time we'll have to be a bit rougher. Who knew?
But what a huuuuuge difference the carbs, exhaust, distributor, and ratio rockers make. It's like a totally different car and it was a blast to drive home.
The only problem was the dreaded oil light...
Got off the highway and it almost stalled at idle and the oil light came on. Idle seemed slower than when cold and engine was rattling a bit. Gave it a bit of gas and the light went away. Same at each stop light. We went shopping for about an hour. Got back in and idle was great and everything sounded fine. Then getting off the highway again the boggy idle and red light stuff again.
What could it be?
a) oil pump problem
b) relief valve problem
c) carb linkage/idle screw expanding when hot changing idle speed
d) OP sender problem
Re: '73/1500
Posted: Fri May 25, 2012 8:23 pm
by Glenn
Maybe turn the idle up a bit. It tends to drop down when the engine is fully warmed up.
Re: '73/1500
Posted: Fri May 25, 2012 8:34 pm
by D-A-N
Glenn wrote:Maybe turn the idle up a bit. It tends to drop down when the engine is fully warmed up.
Ok....sounds good. I'll check the idle tomorrow when it's cold and again when it's warmed up and make sure it's good enough for both temps.
Re: '73/1500
Posted: Fri May 25, 2012 8:40 pm
by Glenn
I usually carry a 8mm wrench in my glove box so when the warm weather comes I crank up the idle a bit. Remember your carbs don't have chokes.
Re: '73/1500
Posted: Sat May 26, 2012 8:23 am
by Raj
The oil light sounds like a product of low idle.
I agree to bump up the idle a bit. You will be playing with your carbs for some time until you get them just right. Welcome to dual carbs!
don't forget to dump that oil soon. And adjust the valves
Re: '73/1500
Posted: Mon May 28, 2012 5:06 pm
by D-A-N
Raj wrote:The oil light sounds like a product of low idle.
I agree to bump up the idle a bit. You will be playing with your carbs for some time until you get them just right. Welcome to dual carbs!
don't forget to dump that oil soon. And adjust the valves
Changed the oil today....was still green (Brad Penn), no metal particles, a little bit of dirt in the screen but very little. All was good. Valves are good. Went to the Jersey Shore and back this weekend and it drove like a champ and got 28mpg on that tank. Not bad altogether.
And Glenn and Raj....you were right....the oil light was the idle. Once the engine was warmed up, the idle was only 650rpm!! The guy at Kaddie Shack (where I bought the carbs from) recommends 1100rpm so I'm trying that for the time being and I'll see what's up. Thanks for the tip fellas.
We also got someone to ship our Squareback out here....it's getting picked up this evening and should arrive by the end of the week. Altogether a good weekend in our part of VW world.
Re: '73/1500
Posted: Mon May 28, 2012 5:16 pm
by Glenn
850-900rpm is where it should idle.
1100 is way too high.
Re: '73/1500
Posted: Mon May 28, 2012 5:26 pm
by D-A-N
Glenn wrote:850-900rpm is where it should idle.
1100 is way too high.
Yeah....I always did our single carb at 900 so I thought Mr. Kaddie Shack was giving some Kadron specific advice.
I'll back it down tomorrow.
Thanks Glenn.