'71 White Wagon

The place to document your restoration, or maintenance of your Vintage VW.
Forum rules
Please recycle your forum, and utilize the same chat for all projects related to a single vehicle.

We recommend a broad title such as your name, car year and model; such that it is applicable to whatever projects you tackle.

For issues related to a vehicle specific part, aftermarket accessories, or replacement parts please include the year, model, and application.

For engine related questions also include your engine size and configuration, along with any upgrades or modifications.
User avatar
Raj
Posts: 1935
Joined: Tue Sep 09, 2008 8:03 pm
Location: Long Island, NY

Re: '71 White Wagon

Post by Raj »

AoT wrote: I did not put the hose clamp on the rear side of the shroud.
:P

you mean front...right?

The only thing you can do now is lower the motor slightly...just enough to squeeze your arm or body in there to fix the cable routing. Its a PITA nd I have done this way more many times than I wish to admit. grrrrrr.
Glenn wrote:I have to say, this "gruppe" is so much more than just a car club.
MrBreeze wrote: This is the DVG board. The threads flow as they flow.
Deal with it.
User avatar
Tom
Posts: 1047
Joined: Sun Sep 14, 2008 12:02 pm
First Name: Tom
Location: Under the bus

Re: '71 White Wagon

Post by Tom »

From what I understand there are no rear tranny mounts on a type 1 bus so I think all you need to do is unbolt the mustache bar and lower the engine and do what you need to do and jack it back up and put the bolts back in.
I'm not an air cooled snob , I like them all !
Brown wrote:Tom is right!
AoT
Posts: 1029
Joined: Fri Oct 17, 2008 8:09 pm
First Name: Audrey
Vehicle Year: 1974
Model: Beetle
Location: Ready for a road trip....

Re: '71 White Wagon

Post by AoT »

Kudos for the suggestion to try using a cable tie to secure the accelerator tube to the shroud. (front). It worked to keep it from wiggling up to the carb. Much easier than dropping the engine.

Checked the dizzy this morning when I went out to get the paper and the center wire is off the coil so that explains a lot. Will give it a crank after work. Can't forget the basics. Thanks to the team for all the feedback!
Keep working at it and it gets done!!
AoT
Posts: 1029
Joined: Fri Oct 17, 2008 8:09 pm
First Name: Audrey
Vehicle Year: 1974
Model: Beetle
Location: Ready for a road trip....

Re: '71 White Wagon

Post by AoT »

Dizzy wire connected and turned over on the first try!

Took it for a fill up and it runs so quiet. Got to get the inspection done to get it road ready

Some oil around the gen stand so will have to check on that
Keep working at it and it gets done!!
User avatar
ObnoxiousBlue
Site Admin
Posts: 1422
Joined: Tue Sep 09, 2008 5:23 pm
First Name: Mike
Vehicle Year: 1964
Model: Beetle
Location: Above ground...
Contact:

Re: '71 White Wagon

Post by ObnoxiousBlue »

AoT wrote:Dizzy wire connected and turned over on the first try!
Lol was it the one I said?
User avatar
Tom
Posts: 1047
Joined: Sun Sep 14, 2008 12:02 pm
First Name: Tom
Location: Under the bus

Re: '71 White Wagon

Post by Tom »

I feel like you're neglecting the Wonder . :cry:
I'm not an air cooled snob , I like them all !
Brown wrote:Tom is right!
AoT
Posts: 1029
Joined: Fri Oct 17, 2008 8:09 pm
First Name: Audrey
Vehicle Year: 1974
Model: Beetle
Location: Ready for a road trip....

Re: '71 White Wagon

Post by AoT »

Tom wrote:I feel like you're neglecting the Wonder . :cry:
I have. Once the bus is inspected and cleaned up for the show, I will get back to the Wonder. Need to find out what is leaking on the brake system and it needs some TLC. also have to finish the rear bumper set up. thanks for the reminder Tom!
Keep working at it and it gets done!!
AoT
Posts: 1029
Joined: Fri Oct 17, 2008 8:09 pm
First Name: Audrey
Vehicle Year: 1974
Model: Beetle
Location: Ready for a road trip....

Re: '71 White Wagon

Post by AoT »

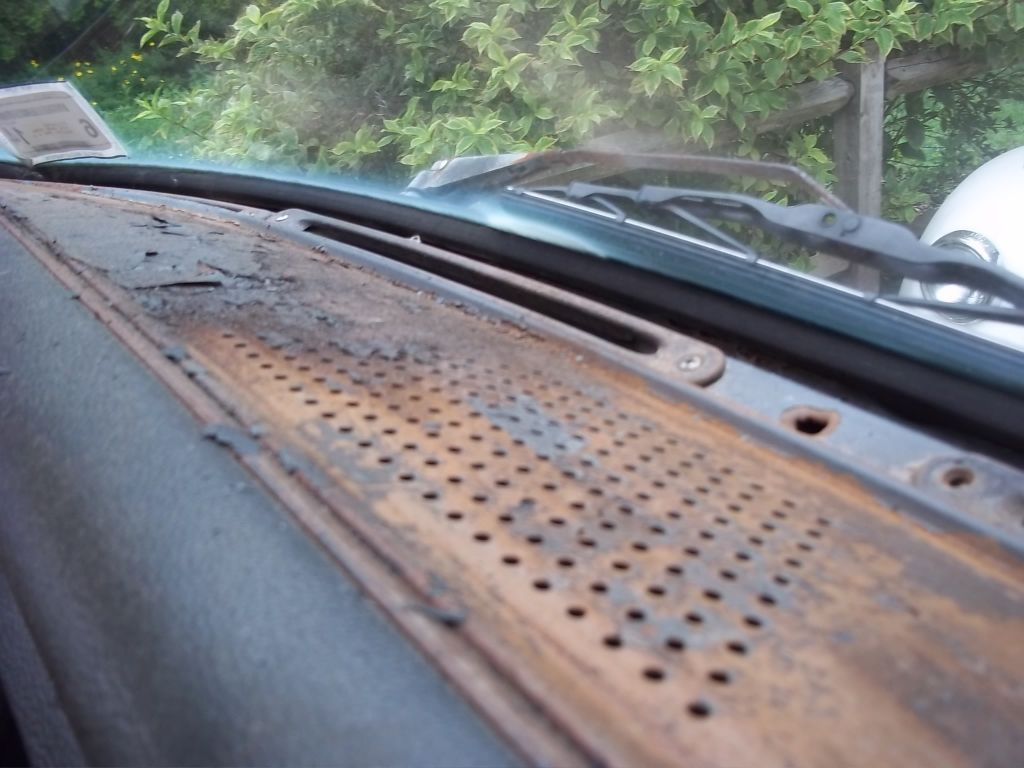
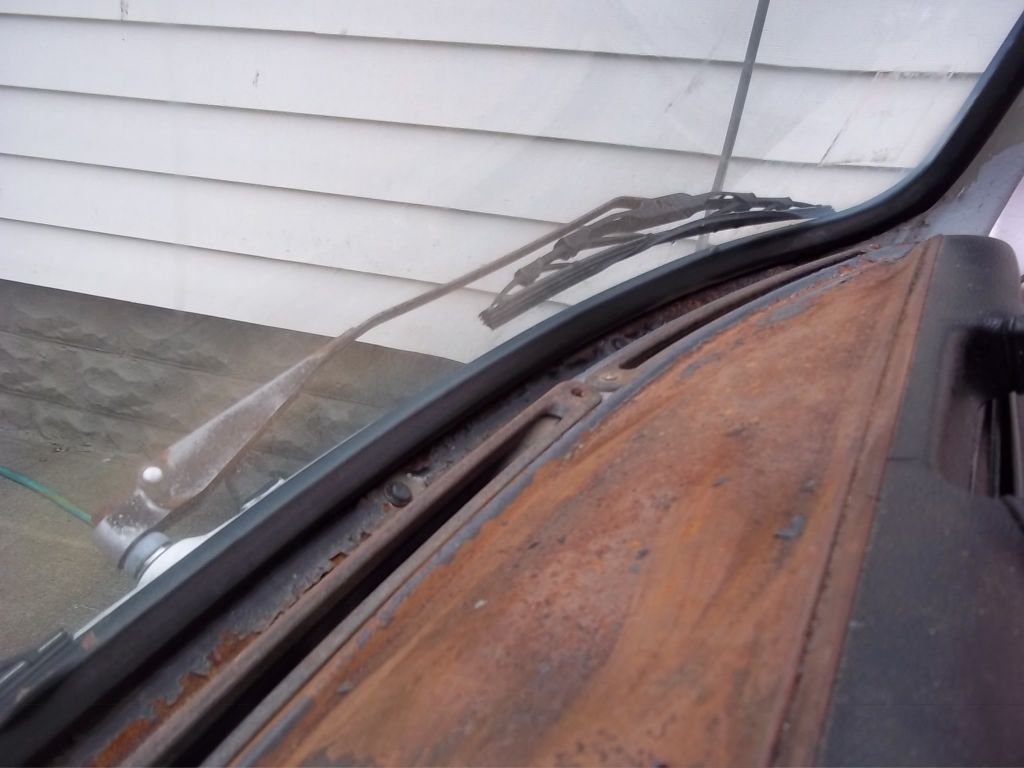
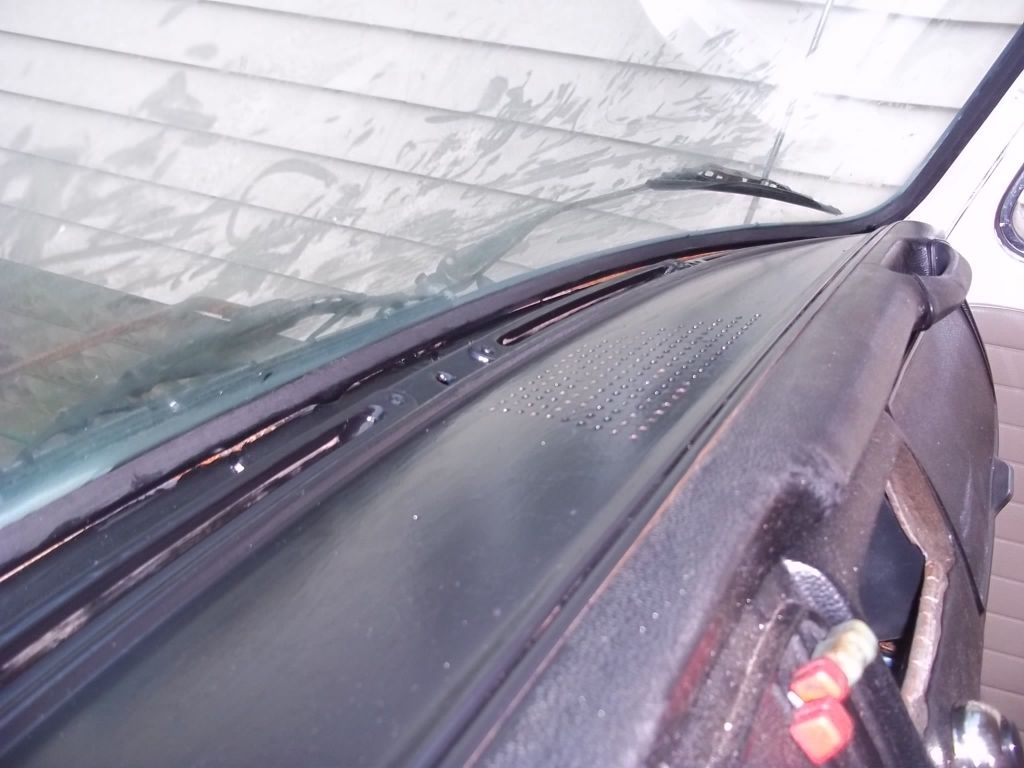
Took the brush to the metal yesterday and worked on the dashboard. Wire brushed it and got off all the flaking paint and gave it a few coats of black satin.

Image

Image

Cleaned up nice!

Image

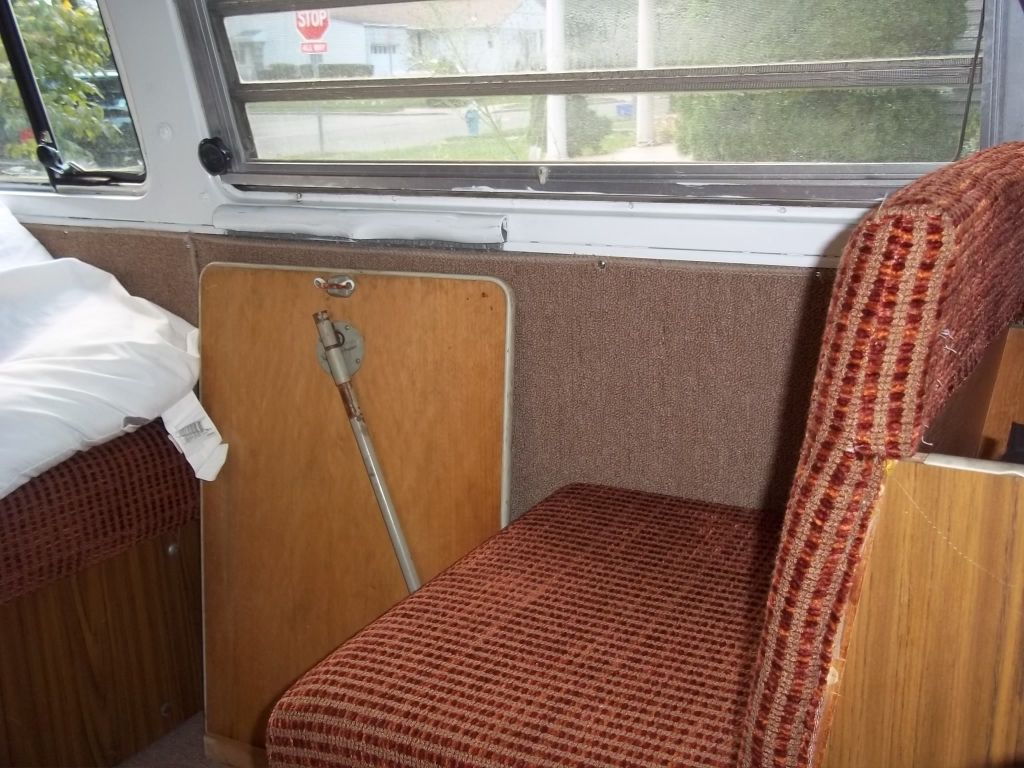
Wanted to get the open spaces and insulation covered for the show so I used my carpet idea and it looks much better. Need to get the correct screws to hang the table!

Image

this week will get it washed and ready to its first show!! :P
Keep working at it and it gets done!!
AoT
Posts: 1029
Joined: Fri Oct 17, 2008 8:09 pm
First Name: Audrey
Vehicle Year: 1974
Model: Beetle
Location: Ready for a road trip....

Re: '71 White Wagon

Post by AoT »

Inspection is done and good to go. Got the bus washed and ready for Sunday.

Getting it washed shows the need to replace the window seals. Tthe rubber is so dry and water on the inside glass. Whose got the secret on this?
Keep working at it and it gets done!!
User avatar
Tom
Posts: 1047
Joined: Sun Sep 14, 2008 12:02 pm
First Name: Tom
Location: Under the bus

Re: '71 White Wagon

Post by Tom »

AoT wrote:Inspection is done and good to go. Got the bus washed and ready for Sunday.

Getting it washed shows the need to replace the window seals. Tthe rubber is so dry and water on the inside glass. Whose got the secret on this?

I did the windshield seal on the bug, there is a trick. I'll tell you about it tomorrow.
I'm not an air cooled snob , I like them all !
Brown wrote:Tom is right!
User avatar
ObnoxiousBlue
Site Admin
Posts: 1422
Joined: Tue Sep 09, 2008 5:23 pm
First Name: Mike
Vehicle Year: 1964
Model: Beetle
Location: Above ground...
Contact:

Re: '71 White Wagon

Post by ObnoxiousBlue »

Aud I did the one on the front of my bus when I first got because they put in a new windscreen, but used a seal that didnt completely fill the opening in the curves of the body and I didnt want to let water get in. Ive done flat windows on beetles too, which are totally different beasts just due to the sheer size, added by the compound curves in the window. Its a bit tricky, but only in the detail, but easy in comparison to what youve done. We can talk, and when youre ready Ill swing by to give you a hand.

Make sure to buy the seal with the larger "bottom" some seals fall short, but they make a bus seal that has about 3/8" extra material at the bottom that overlaps the sheetmetal below the windscreen to keep water from getting in under the window... a trouble spot in baywindows.
AoT
Posts: 1029
Joined: Fri Oct 17, 2008 8:09 pm
First Name: Audrey
Vehicle Year: 1974
Model: Beetle
Location: Ready for a road trip....

Re: '71 White Wagon

Post by AoT »

thanks. Look forward to getting it done.
Keep working at it and it gets done!!
AoT
Posts: 1029
Joined: Fri Oct 17, 2008 8:09 pm
First Name: Audrey
Vehicle Year: 1974
Model: Beetle
Location: Ready for a road trip....

Re: '71 White Wagon

Post by AoT »

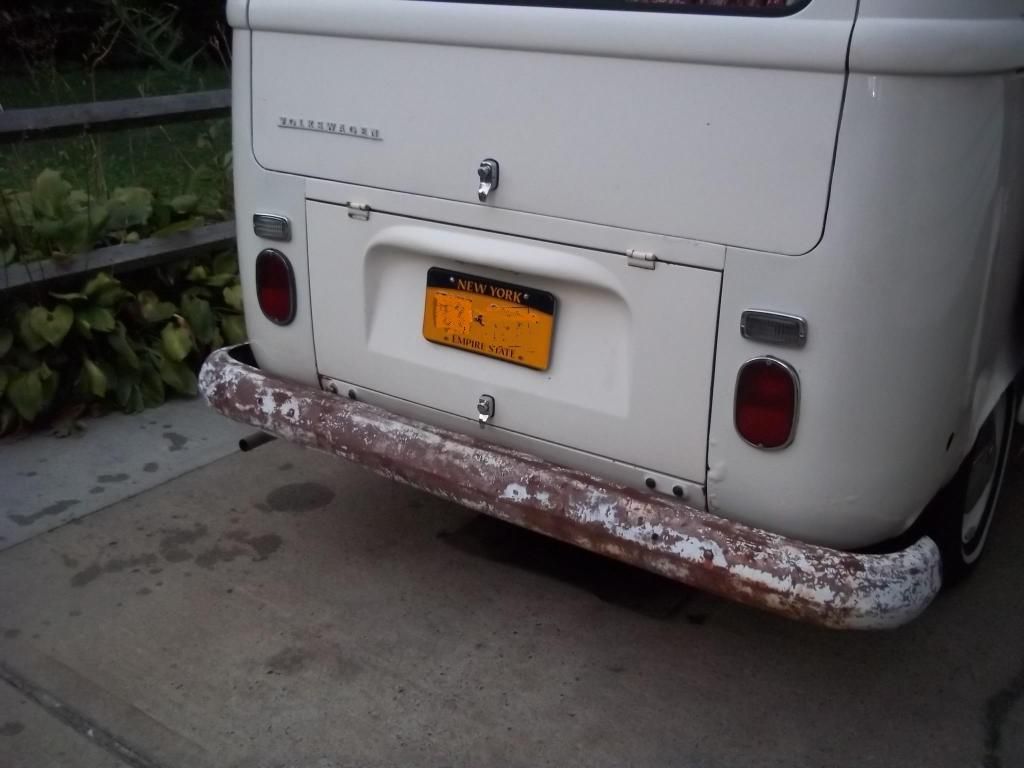
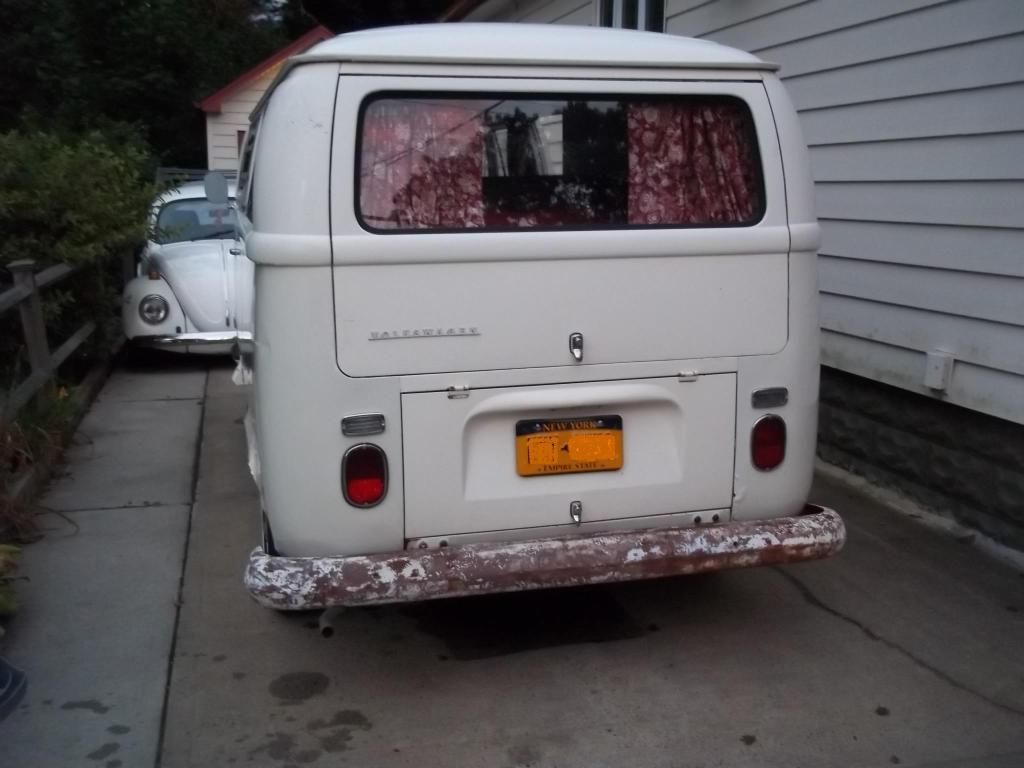
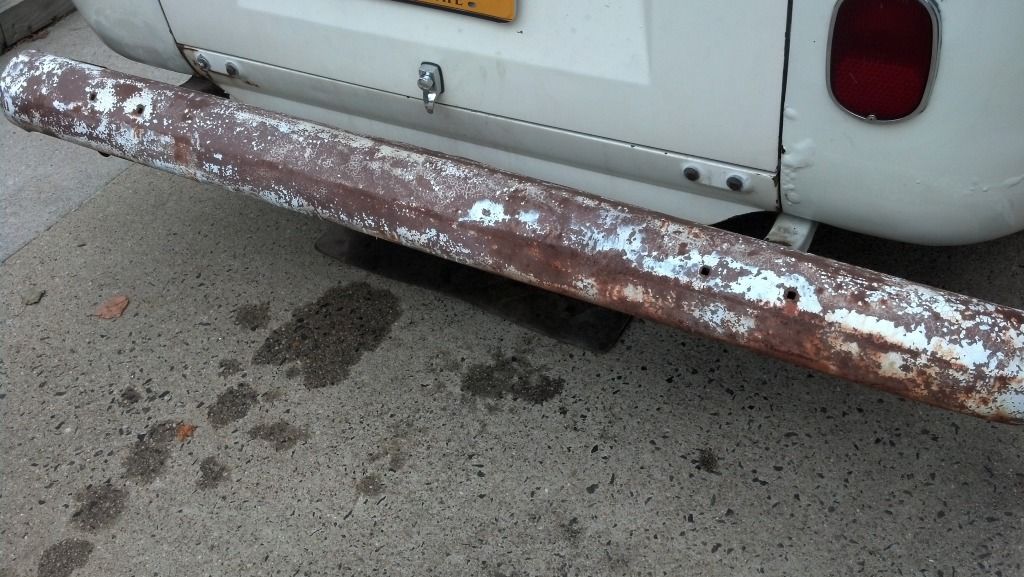
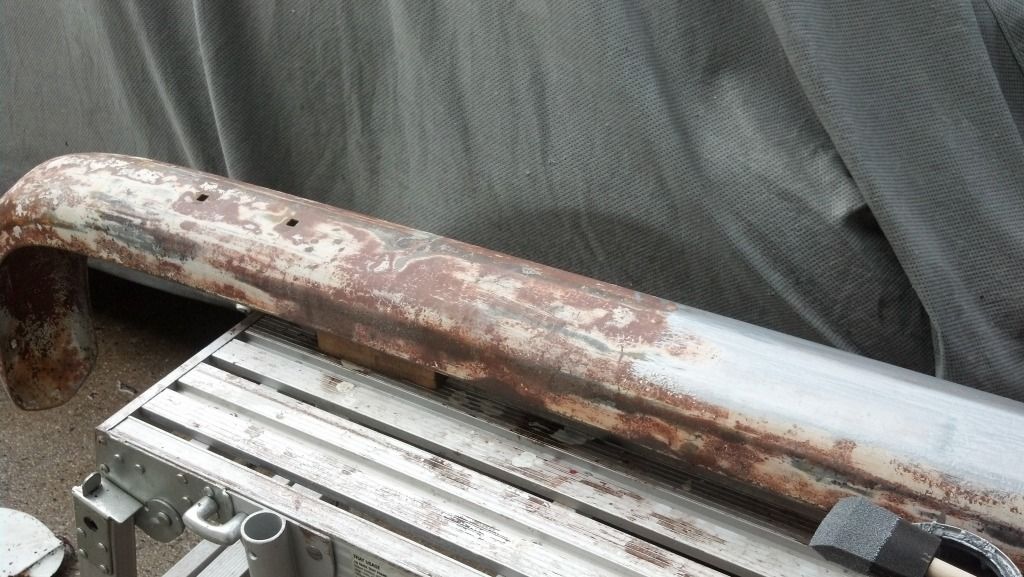
Was getting ready to bring some stuff up to Terryville to sell and figured I would keep the best of the two bumpers I have. One came with the bus and the other i picked at GT. I went with the one from GT since it was straight and no dents. It needs a little wire brushing and some paint due to surface rust but it is stylng!

I took the brackets off and used the ones on the bus so that I did not have to break those nuts!! :lol:
Image

On for the season and then will work on it when the engine is out next! :(
Image

Didn't make it to the vending area so next stop is Flanders!
Keep working at it and it gets done!!
AoT
Posts: 1029
Joined: Fri Oct 17, 2008 8:09 pm
First Name: Audrey
Vehicle Year: 1974
Model: Beetle
Location: Ready for a road trip....

Re: '71 White Wagon

Post by AoT »

Was not in the mood yesterday to get claustrophobic working on the wonder's brake line so got some work done on the bus.

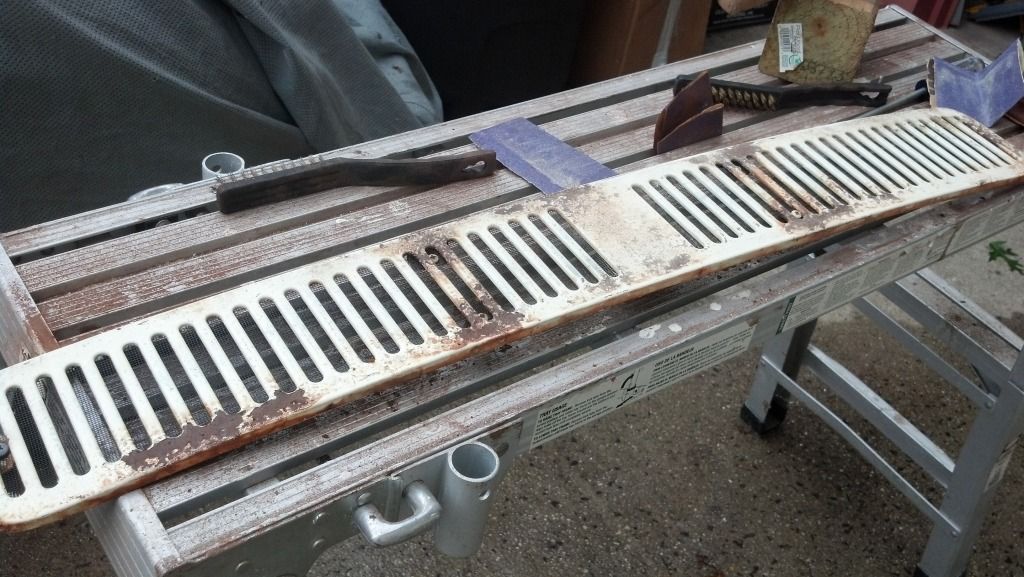
Took off the rear bumper and got it cleaned up and ready to paint. The patina look was not working. Sanded it down and cleaned it up with marine clean. Also am doing the same thing to the front grill.

Image

Image

Sanded down and putting on a coat of POR15. I bought the silver by accident but I like it since alot of want I paint is black and this lets me see what spots I missed. Plus with the cream color it is easier to cover.

Image

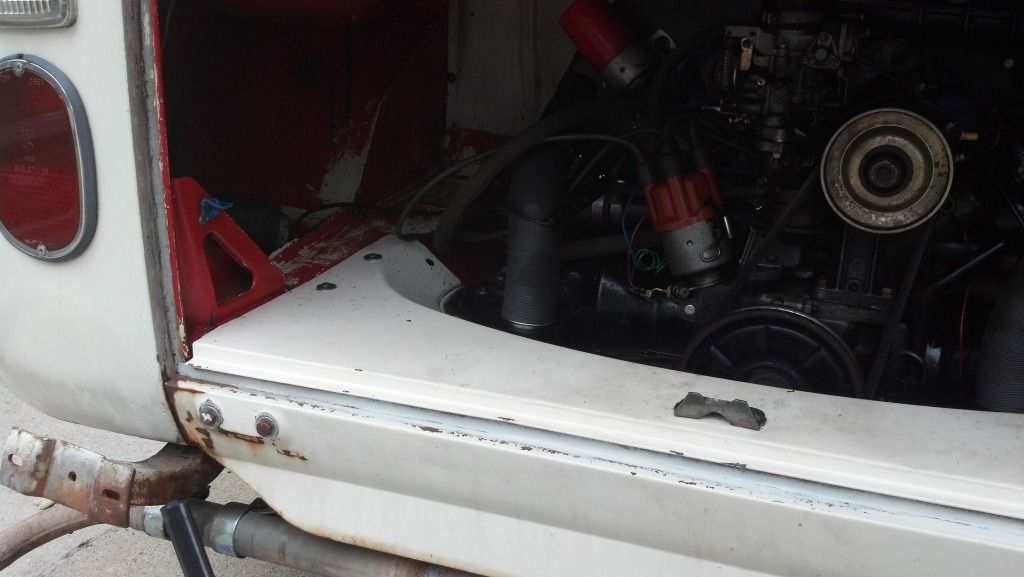
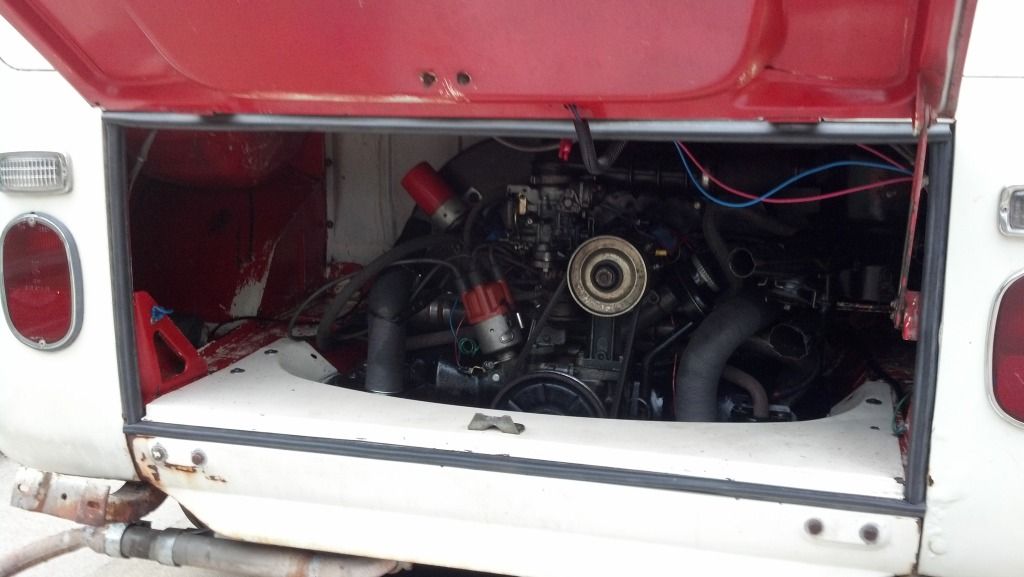
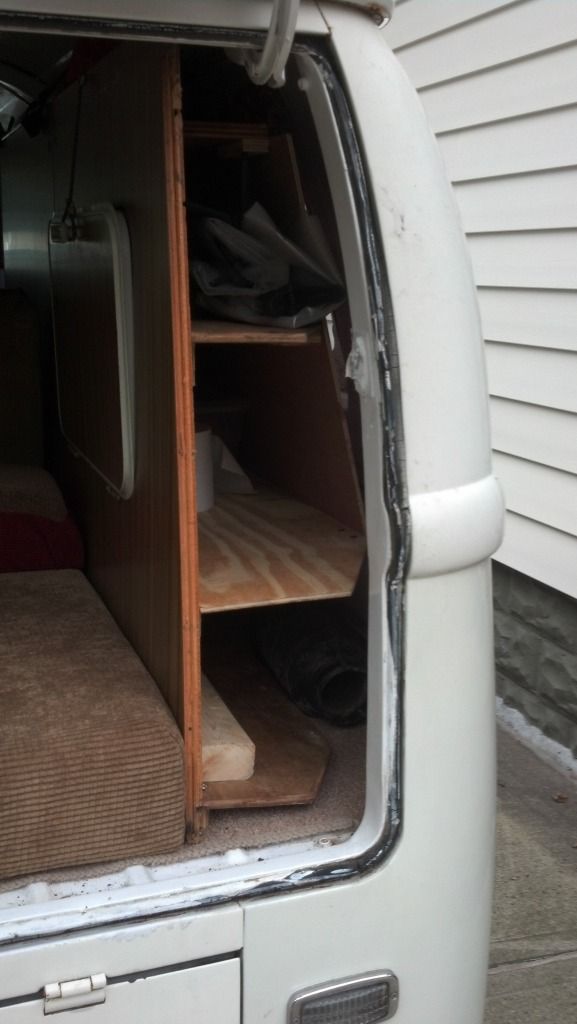
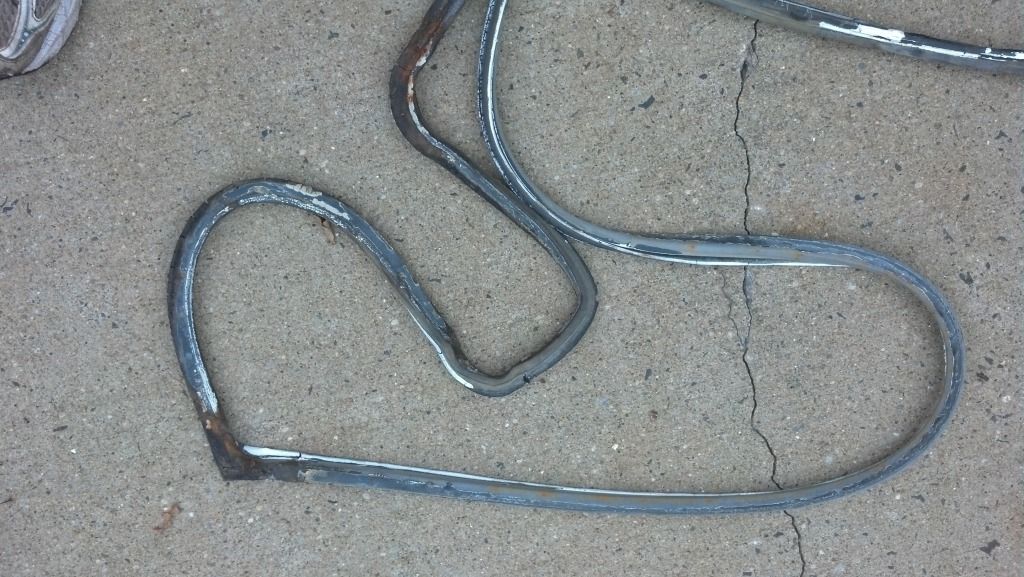
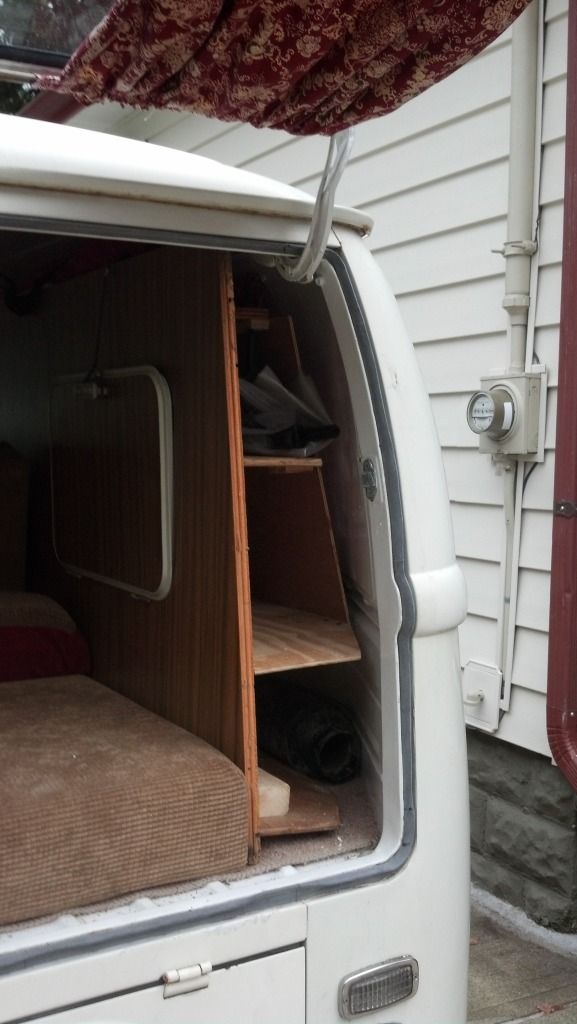
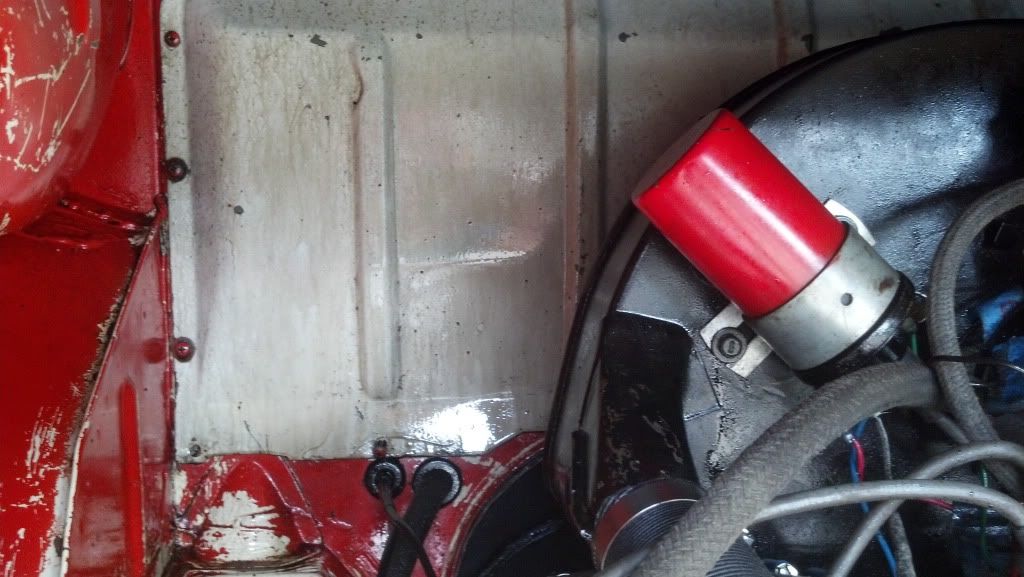
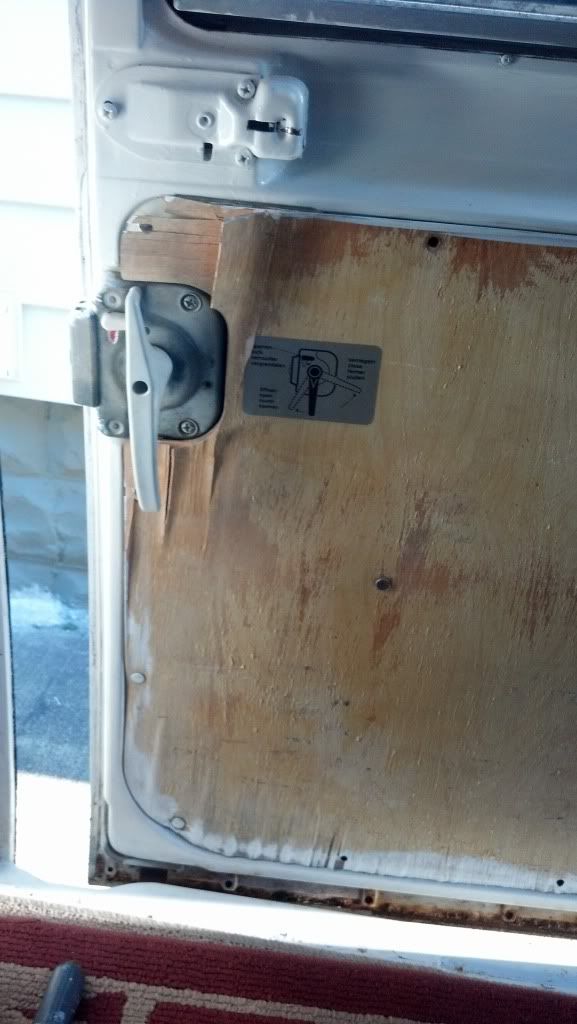
The new seals got delivered so I got the ones on the engine compartment and rear hatch replaced. The engine compartment is a tight fit and the door does not lay flush by it gives it a tight seal. I adjusted the locking latch to the closest point but didn;t make much difference.

Image

Image

the rear hatch was nasty so I was glad to see that one go.

Image

Image

Image

Will finish up the paint on the bumpers this week and make plans for the front and rear windshield seals!

this is what labor day looks like at my house!!

Image

:P
Keep working at it and it gets done!!
AoT
Posts: 1029
Joined: Fri Oct 17, 2008 8:09 pm
First Name: Audrey
Vehicle Year: 1974
Model: Beetle
Location: Ready for a road trip....

Re: '71 White Wagon

Post by AoT »

Felt the 48 hour post injury aches today but still got some bus work done. Stayed away from mechanical but got some painting and cleaning done.

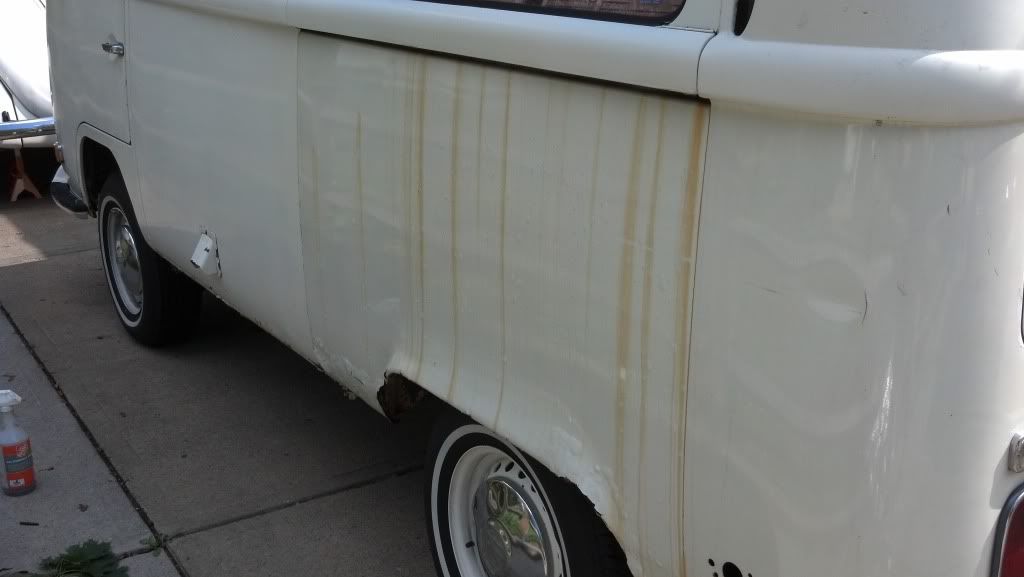
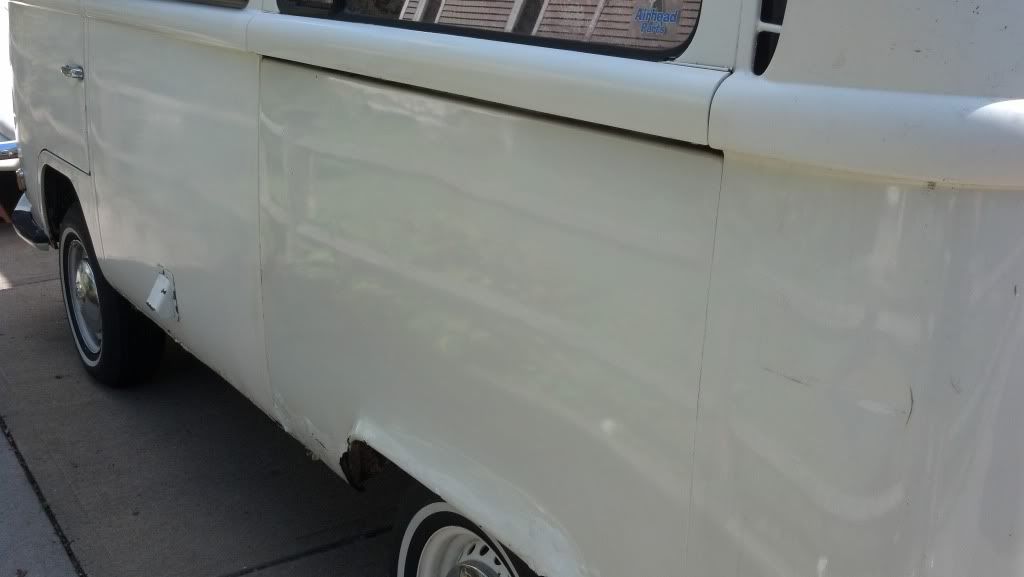
I had asked around about getting the rust streaks off the rear DS panel. Was told CLR was a good product so i bought some. I decided to give the panel a wipe down with the "purple"stuff before i used the clr. Was wowed shen i saw the purple stuff took off the stains. Easy solution.

Image

Image

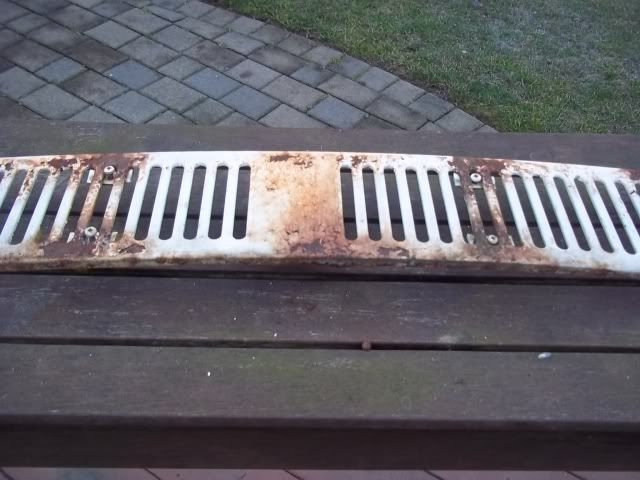
To avoid this repeating i wire brushed the track under the track cap and gave it a coat of por-15.

Finished getting the bumper and grill painted to re-install this week. Then i went out for a run and passed the scene of the injury. The concrete flag was raised about 3 inches. Think i'll spray it with pink flouro paint to glow in the dark. :P
Keep working at it and it gets done!!
User avatar
ObnoxiousBlue
Site Admin
Posts: 1422
Joined: Tue Sep 09, 2008 5:23 pm
First Name: Mike
Vehicle Year: 1964
Model: Beetle
Location: Above ground...
Contact:

Re: '71 White Wagon

Post by ObnoxiousBlue »

Looks great Aud! Seems like youre gonna have to compound that whole bus now to get the other panels looking just as nice! Cant wait to see how the bus looks in person!

Thought of you today... While removing a decal from Peabody's back passenger side window, I sliced a piece of my window seal :twisted: We can park next to each other while we do the windows! At least neither of us have the damn aluminum trim!
AoT
Posts: 1029
Joined: Fri Oct 17, 2008 8:09 pm
First Name: Audrey
Vehicle Year: 1974
Model: Beetle
Location: Ready for a road trip....

Re: '71 White Wagon

Post by AoT »

Gave the bus a little face lift!! :D

Image


Image
Keep working at it and it gets done!!
User avatar
Raj
Posts: 1935
Joined: Tue Sep 09, 2008 8:03 pm
Location: Long Island, NY

Re: '71 White Wagon

Post by Raj »

Grille makeover....... 'oh yeah!'
diamond_teeth.gif
diamond_teeth.gif (55.45 KiB) Viewed 26022 times
Glenn wrote:I have to say, this "gruppe" is so much more than just a car club.
MrBreeze wrote: This is the DVG board. The threads flow as they flow.
Deal with it.
User avatar
ObnoxiousBlue
Site Admin
Posts: 1422
Joined: Tue Sep 09, 2008 5:23 pm
First Name: Mike
Vehicle Year: 1964
Model: Beetle
Location: Above ground...
Contact:

Re: '71 White Wagon

Post by ObnoxiousBlue »

Looks awesome Audrey! Cant wait to see it in person.
User avatar
Kermit
Posts: 65
Joined: Mon Nov 15, 2010 11:49 pm
First Name: Kermit
Vehicle Year: 1969
Model: Beetle
Location: New York, NY

Re: '71 White Wagon

Post by Kermit »

Amazing job so far, Audrey!
Glenn wrote:DVG, we see all.
AoT
Posts: 1029
Joined: Fri Oct 17, 2008 8:09 pm
First Name: Audrey
Vehicle Year: 1974
Model: Beetle
Location: Ready for a road trip....

Re: '71 White Wagon

Post by AoT »

Bus ran great for the trip to Flanders but it looks like its time to change the oil cooler. Its starting to look like an oil slick.

Image

Image

Last big trip for the season! :(
Keep working at it and it gets done!!
User avatar
dubstar
Posts: 162
Joined: Fri Jun 05, 2009 9:44 am
First Name: John
Location: Long Beach, New York
Contact:

Re: '71 White Wagon

Post by dubstar »

transporterfest...
john aka dubstar
1963 Type 2 Kombi
1977 Type 1 FI

wanted: any year / condition split window middle and rear seats for the '63

"oh ya! the bus has tires that hold air now and all drums are freeded"
User avatar
ObnoxiousBlue
Site Admin
Posts: 1422
Joined: Tue Sep 09, 2008 5:23 pm
First Name: Mike
Vehicle Year: 1964
Model: Beetle
Location: Above ground...
Contact:

Re: '71 White Wagon

Post by ObnoxiousBlue »

dubstar wrote:transporterfest...
+1
AoT
Posts: 1029
Joined: Fri Oct 17, 2008 8:09 pm
First Name: Audrey
Vehicle Year: 1974
Model: Beetle
Location: Ready for a road trip....

Re: '71 White Wagon

Post by AoT »

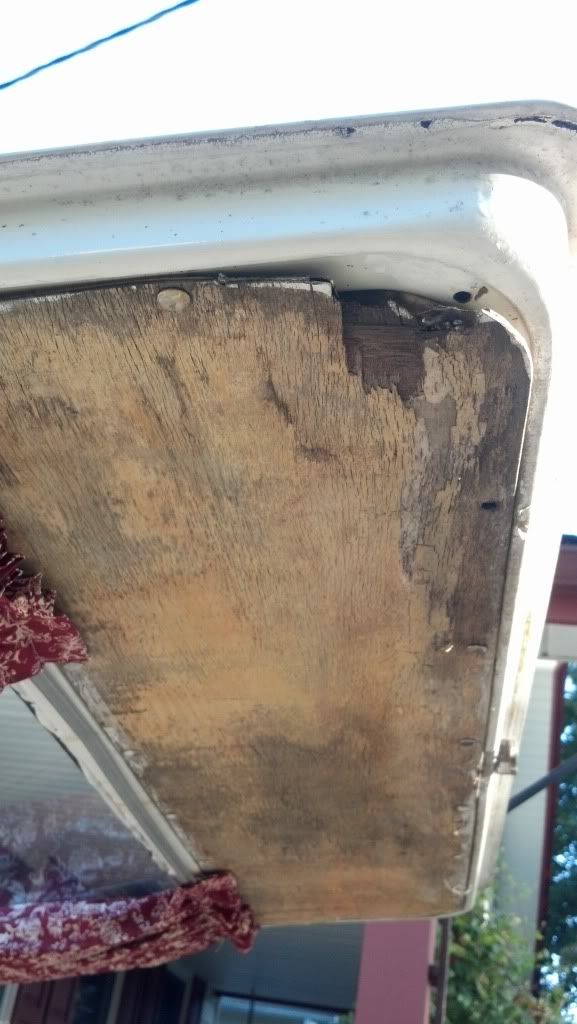
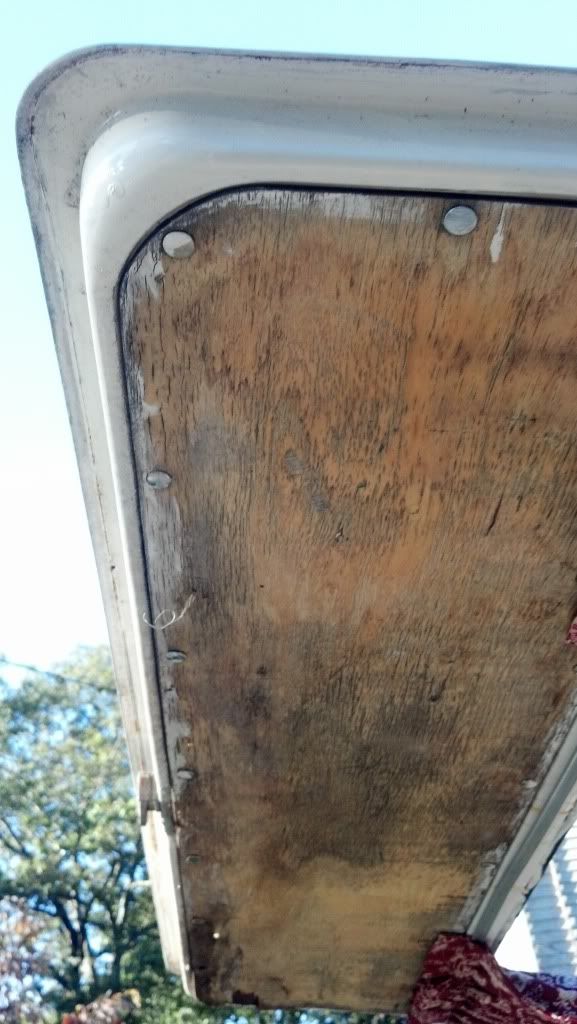
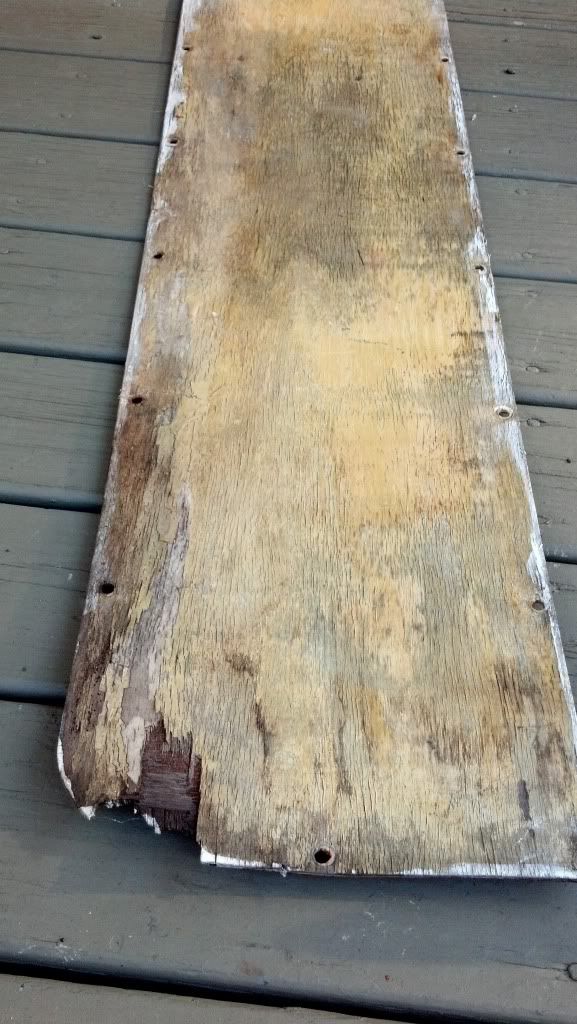
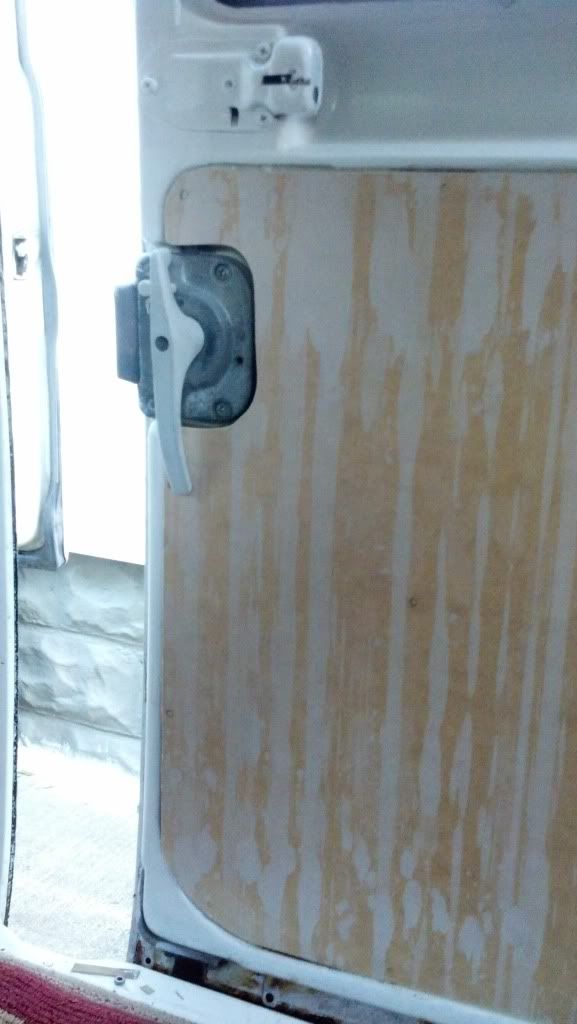
Decided to try and get some of the interior issues done so that i can get a stereo and speakers installed. All of the door panels are shot. The current ones were picked off a bus and the lower edges are shot. I bought a sheet of paneling and some vinyl to recreate the look. Thats tomorrows project but after work i took on the rear and slider panels.

Both had lots of water damage and all the veneer layers had lifted.

Image

Image

The PO had a heavy hand on painting the inside.
Image

Image

Slider panel cut and fitted. I am going to cover with the door panel vinyl and same with the rear hatch. Need to get a few more flat head panel studs that hold the panels to the door. Door panels and glueing the panels up is the plan for tommow. I ordered some speakers so i can get them installed on the doors while everything is open.

Image
Keep working at it and it gets done!!
User avatar
Raj
Posts: 1935
Joined: Tue Sep 09, 2008 8:03 pm
Location: Long Island, NY

Re: '71 White Wagon

Post by Raj »

Nice. What color vinyl or fabrics will you use to cover them. The interior of the bus is really looking awesome!
Glenn wrote:I have to say, this "gruppe" is so much more than just a car club.
MrBreeze wrote: This is the DVG board. The threads flow as they flow.
Deal with it.
Post Reply